
Irresistible Cookie Croissant Recipe – A Sweet Twist on Classic Pastries!
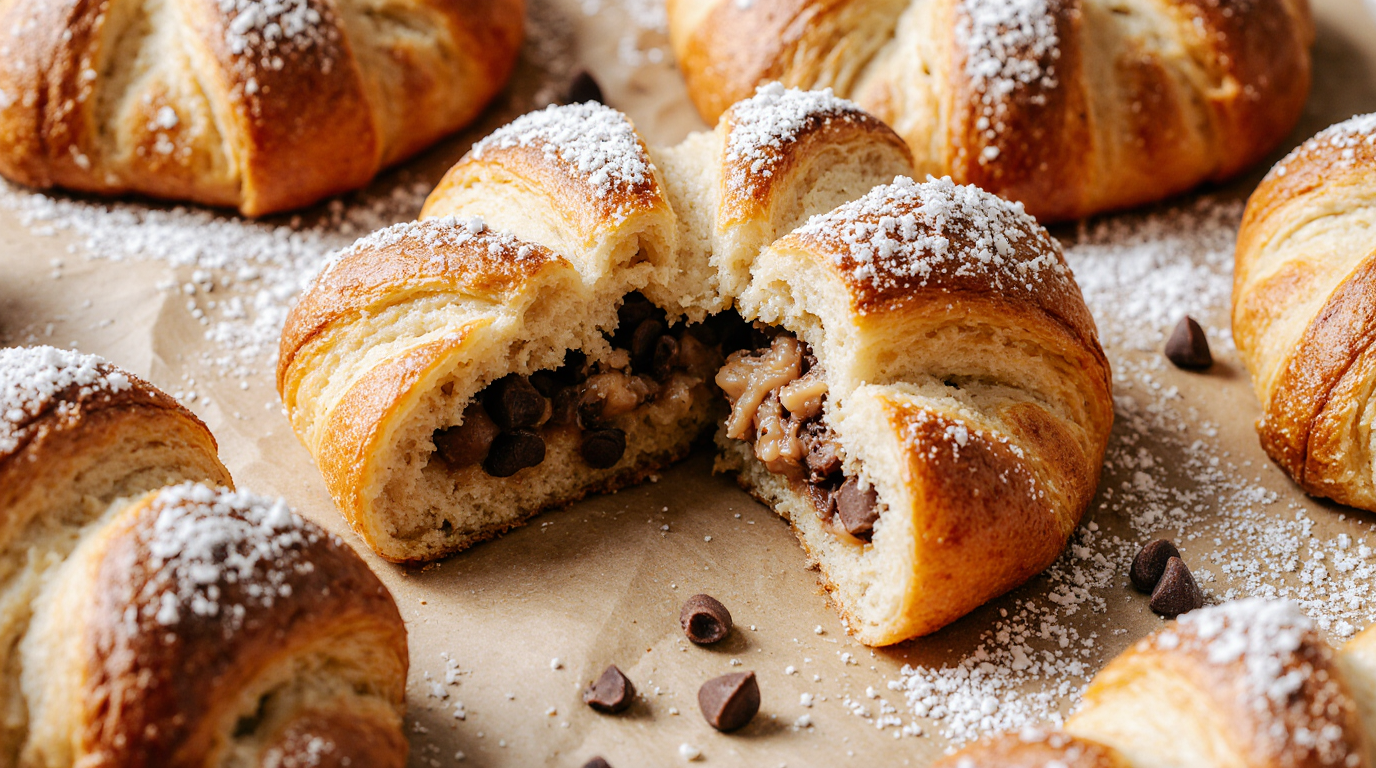
Welcome to my kitchen! Today, I’m sharing my foolproof guide to cookie croissants, a dessert that never fails to amaze. Picture this: you take a bite and experience the crispy crunch of golden pastry layers, followed by the warm, melty sweetness of cookie dough center. It’s pure magic! I stumbled upon this incredible creation at a charming café during a weekend getaway, and I’ve been obsessed ever since. The moment I tasted that first bite, I knew I had to recreate it at home and share it with you.
This recipe is perfect for anyone who loves bakery treats and wants something impressive yet surprisingly simple to make. What I love most about cookie croissants is how they look like you spent hours in the kitchen, but the secret? They come together in under 30 minutes with just two main ingredients. Whether you’re planning a special brunch, need a show-stopping dessert, or simply want to treat yourself on a lazy Sunday morning, these beauties deliver every single time.
The genius of cookie croissants lies in their adaptability. Start with the classic chocolate chip version, then branch out to peanut butter, double chocolate, or even seasonal flavors. Each variation brings something unique to the table while maintaining that incredible contrast between crispy exterior and gooey interior. So, are you ready to discover why bakers everywhere are falling in love with this trending treat? Let’s get started and transform simple ingredients into something extraordinary!
Table of Contents
Quick Recipe Facts
- Prep Time: 10 minutes
- Cook Time: 12-14 minutes
- Total Time: 25 minutes
- Servings: 6-8 pastries
- Difficulty: Beginner-friendly
- Calories: Approximately 290-320 per pastry (varies with fillings)
Why you’ll love it: This recipe requires minimal effort but delivers maximum wow factor – absolutely perfect for busy mornings or when you need an impressive dessert fast! Your journey to creating professional-quality flaky pastry starts here, and I promise you’ll be amazed at how simple it really is.
Ingredients
Creating these stunning cookie croissants requires surprisingly few ingredients, making this recipe accessible for everyone. The magic happens when quality butter-rich croissants meet sweet cookie dough, creating layers of flavor and texture that’ll have everyone asking for seconds.
Core Ingredients:
- 6-8 fresh butter croissants (the flakier, the better!)
- 1-2 cups prepared cookie dough (your choice of flavor)
Flavor Enhancers (Optional):
- ½ cup premium chocolate chips (dark, milk, or semi-sweet)
- ¼ cup chopped nuts (pecans, walnuts, or hazelnuts add wonderful crunch)
- Flaky sea salt for finishing
- 1 teaspoon pure vanilla extract (elevates any flavor combination)
- Powdered sugar for elegant dusting
Ingredient Selection Tips:
Quality matters tremendously here. Select croissants that feel light when you lift them and show visible flaky layers. Fresh croissants from your local bakery work wonderfully, though quality grocery store options produce excellent results too. The croissant should have that unmistakable butter aroma – that’s your green light for perfect dessert croissants!
For cookie dough, you have complete freedom. Pre-made refrigerated dough saves time and works beautifully. Popular options include classic chocolate chip, sugar cookie, peanut butter, or snickerdoodle varieties. Each type creates a distinctly different experience, so feel free to experiment and discover your favorite combination.
Storage and Handling:
Keep your cookie dough refrigerated until you’re ready to assemble. Cold dough is easier to work with and less likely to spread excessively during baking. Your croissants should rest at room temperature – never refrigerated, as cold temperatures compromise their delicate texture. If you’re working with frozen croissants, allow them to thaw completely at room temperature before proceeding.
High-quality chocolate makes a noticeable difference. Choose chocolate with at least 60% cocoa content for rich flavor that balances the pastry’s buttery sweetness. If adding nuts, lightly toast them first to intensify their flavor and add extra crunch to your bakery treats.
Required Tools and Equipment
Creating bakery-quality dessert croissants at home doesn’t require fancy equipment. Most items are probably already in your kitchen, making this recipe wonderfully accessible for bakers of all levels.
Must-Have Tools:
- Conventional oven (convection works too!)
- Standard baking sheet or half-sheet pan
- Parchment paper or silicone baking mat
- Cooling rack
- Sharp serrated knife (crucial for clean cuts)
- Standard measuring spoons
Helpful Additions:
An oven thermometer ensures accuracy – many home ovens run hot or cold, and proper temperature is crucial for achieving that perfect flaky pastry texture. A pastry brush helps if you want to add an egg wash for extra shine, though this step remains entirely optional.
Quality baking sheets that don’t warp in high heat make a real difference. Light-colored pans work best, as dark pans can cause excessive browning on the bottoms before the pastry is fully cooked.
Nice-to-Have Equipment:
If you have a small offset spatula, it makes transferring hot croissants much easier. A kitchen timer prevents the common mistake of overbaking – these beauties need careful monitoring during their final minutes in the oven. Some bakers love using kitchen scales for precisely portioning cookie dough, ensuring each croissant has identical filling amounts for uniform appearance.
Don’t stress if your kitchen is simply equipped. The beauty of this recipe is that it doesn’t demand specialized tools. As long as you have basic baking essentials, you’re fully prepared to create impressive results.
Instructions
Let’s walk through creating perfect cookie croissants step by step. This process is straightforward and forgiving, making it ideal for bakers at any skill level.
Step 1: Prepare Your Oven
Set your oven to 375°F and allow it to fully preheat – this typically takes 10-15 minutes. Proper preheating is non-negotiable for achieving that crispy, golden exterior while keeping the center perfectly gooey. Position your oven rack in the center position for optimal heat circulation. While waiting, line your baking sheet with parchment paper to prevent sticking and simplify cleanup.
Step 2: Prepare the Croissants
Using your serrated knife, carefully slice each croissant horizontally through the middle, creating top and bottom halves. Think of it like opening a book. Work slowly and gently – rushing can compress those delicate layers that make croissants so special. For the best flaky pastry results, use a sawing motion rather than pressing down firmly.
Step 3: Add the Filling
Scoop approximately 2-3 tablespoons of cookie dough onto each croissant bottom. The exact amount depends on your croissant size – you want generous filling without overflow. Spread the dough gently with the back of your spoon, leaving a small border around the edges. This prevents excessive oozing during baking while ensuring every bite includes that delicious cookie center.
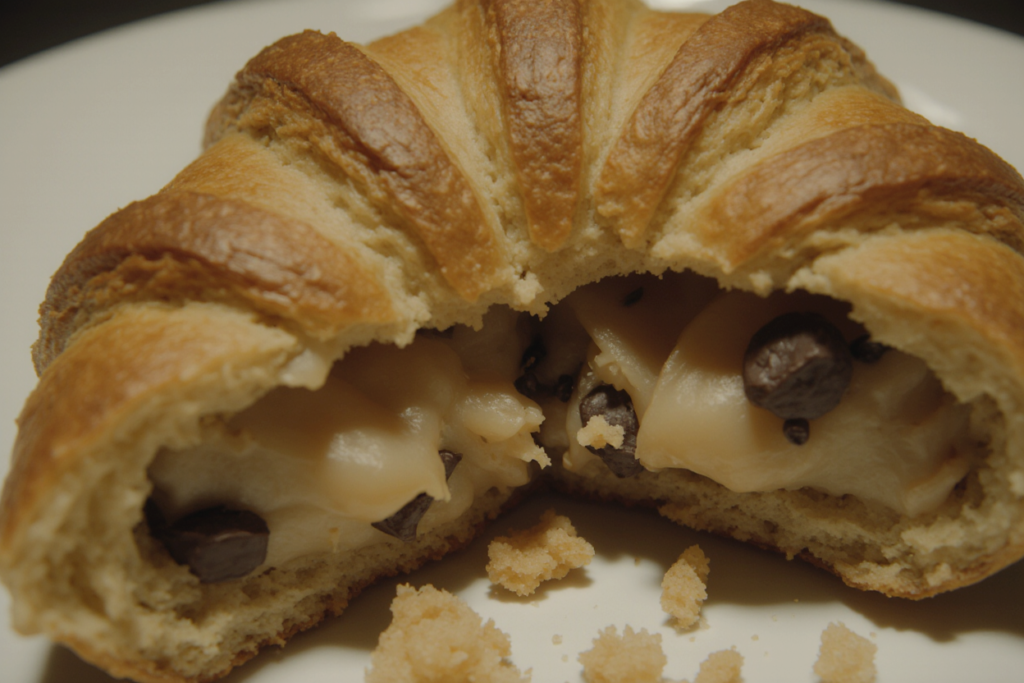
If incorporating extras like chocolate chips or nuts, press them gently into the dough now. This keeps them secure during baking and creates beautiful visual appeal when you slice into the finished product.
Step 4: Seal and Arrange
Place the croissant tops back on, pressing very gently around the edges to seal. Don’t compress – you’re just encouraging the halves to stick together slightly. Arrange your assembled croissants on the prepared baking sheet with about 2 inches between each one. This spacing allows for slight expansion and ensures even browning all around.
Step 5: Bake to Perfection
Slide your baking sheet into the preheated oven and bake for 12-14 minutes. Start checking at the 10-minute mark – you’re looking for deep golden-brown color and slightly puffed appearance. The croissants should smell incredibly buttery and sweet. The cookie dough center will still feel slightly soft, which is exactly what you want. It continues setting as the pastries cool.
Step 6: Cool and Serve
Transfer your baked cookie croissants to a cooling rack immediately. Let them rest for 5-10 minutes before serving. This cooling period is important – it allows the molten cookie center to set slightly, preventing burns while maintaining that perfect gooey texture. The croissants will be extremely hot straight from the oven, so patience pays off here.
The finished product should offer crispy, shattering layers on the outside with a warm, soft cookie center. Each bite delivers that incredible contrast that makes these pastries so addictive.
Nutritional Overview
Here’s the approximate nutritional breakdown per serving:
| Nutrient | Amount Per Serving |
|---|---|
| Calories | 290-320 kcal |
| Carbohydrates | 38g |
| Protein | 5g |
| Fat | 15g |
| Sugar | 12g |
Note: Values vary based on specific ingredients and portion sizes. These figures provide general guidance.
Pro Tips
Master these insider secrets for consistently excellent cookie croissants every single time:
Tip 1: Freshness is Everything
Always choose the freshest croissants available. Day-old croissants lose moisture and won’t achieve that signature shatter when you bite through. If you must use day-old croissants, refresh them briefly in a 300°F oven for 3-4 minutes before filling to restore some of their original texture and butter flavor.
Tip 2: Temperature Control
If your cookie dough feels too soft to work with, pop it in the refrigerator for 15-20 minutes. Properly chilled dough spreads less during baking, resulting in neater, more professional-looking results. Conversely, if your dough is rock-hard from the fridge, let it sit at room temperature for 5 minutes to soften slightly.
Tip 3: The Egg Wash Secret
For that gorgeous bakery shine, brush the tops lightly with egg wash before baking. Mix one egg with one tablespoon of water, whisk well, and apply with a pastry brush. This creates a beautiful golden sheen that makes your bakery treats look professionally made.
Tip 4: Customize with Confidence
Don’t be afraid to experiment with different cookie dough flavors. Snickerdoodle, oatmeal raisin, white chocolate macadamia, or seasonal pumpkin spice all work wonderfully. Each variation creates a completely different taste experience while maintaining that irresistible texture contrast.
Tip 5: Watch Closely at the End
The difference between perfectly golden and slightly overdone happens quickly. Stay near your oven during the final 3-4 minutes of baking. When the tops turn deep golden brown and you catch that heavenly butter-sugar aroma, they’re ready.
Tip 6: The Sea Salt Finish
A light sprinkle of flaky sea salt on top before baking elevates these from delicious to absolutely extraordinary. The salt balances the sweetness and adds a sophisticated flavor dimension that makes people wonder what your secret ingredient is. Trust me on this one – it’s a game-changer for dessert croissants!
Creative Cookie Croissant Variations
The basic recipe is just your starting point. Let’s explore exciting variations that’ll keep your baking repertoire fresh and exciting!
Classic Favorites:
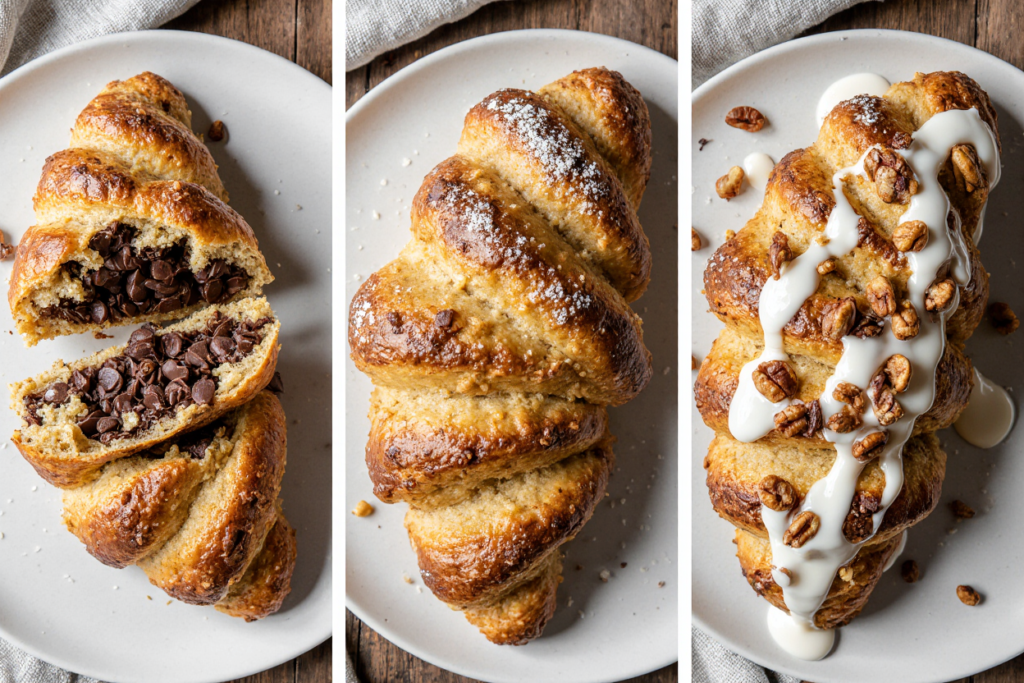
Chocolate Lover’s Dream: Use chocolate chip cookie dough and add extra dark chocolate chunks throughout. After baking, drizzle with melted chocolate for ultimate indulgence.
Peanut Butter Perfection: Fill with peanut butter cookie dough, add mini peanut butter cups, and finish with a drizzle of warm peanut butter. Sprinkle crushed peanuts on top for extra crunch.
Double Chocolate Decadence: Combine chocolate cookie dough with white chocolate chips inside. After baking, dust generously with cocoa powder for sophisticated presentation.
Classic Sugar Cookie: Use vanilla or sugar cookie dough and add colorful sprinkles. Perfect for birthdays or celebrations!
Gourmet Twists:
Salted Caramel Creation: Mix caramel bits into your cookie dough, then drizzle finished croissants with salted caramel sauce. Add a sprinkle of coarse sea salt for that perfect sweet-salty balance.
Nutella Heaven: Swirl Nutella directly into your cookie dough before filling, or layer it between the cookie dough for pockets of hazelnut chocolate goodness.
Berry Bliss: Fold freeze-dried strawberries or raspberries into sugar cookie dough. The concentrated fruit flavor pairs beautifully with the buttery pastry.
Seasonal Specialties:
Autumn Spice: Use pumpkin spice or gingerbread cookie dough. Add chopped pecans and a cream cheese drizzle after baking.
Winter Wonderland: Peppermint cookie dough with crushed candy canes and white chocolate chips captures holiday magic perfectly.
Spring Fresh: Lemon cookie dough with fresh lemon zest and a light lemon glaze brings bright, refreshing flavors.
Summer Celebration: Use sugar cookie dough with fresh berry pieces and a light vanilla glaze.
Tips for Successful Variations:
When experimenting with new combinations, start with quality base ingredients. Real vanilla extract, pure cocoa powder, and premium chocolate chips make noticeable differences. Don’t overload your croissants with too many add-ins – you want to maintain structural integrity while delivering great flavor.
Consider texture contrasts: pair soft cookie dough with crunchy nuts or crispy toffee bits. Think about flavor balance: sweet fillings benefit from a touch of salt, while rich chocolate fillings pair beautifully with bright fruit notes.
Mastering the Perfect Flaky Texture
Understanding what makes croissants flaky helps you preserve that quality throughout the baking process. Let’s dive into the science and practical tips for achieving perfection.
The Science Behind Flakiness:
Croissant flakiness comes from lamination – the process of folding butter into dough repeatedly to create hundreds of delicate layers. When these layered pastries bake, the butter melts and creates steam, causing the layers to separate and puff up. This creates that characteristic shattering crunch we all love.
When making cookie croissants, you’re starting with already-laminated pastry, which simplifies things considerably. Your job is preserving those layers during assembly and baking.
Handling Techniques:
Handle your croissants gently throughout the entire process. Rough handling or excessive pressing compresses those delicate layers, resulting in dense, tough pastry instead of light, crispy perfection. When slicing, use a sawing motion with your serrated knife rather than pressing down firmly.
Room temperature matters significantly. Croissants should never be refrigerated before baking – cold temperatures firm up the butter layers, preventing proper expansion during baking. Conversely, if your kitchen is very warm, work quickly to prevent the butter from melting prematurely.
Baking Considerations:
Proper oven temperature is absolutely crucial for flaky pastry success. Too low, and the butter melts out before the layers set, creating greasy, flat results. Too high, and the exterior burns before the interior cooks through. That 375°F sweet spot ensures the butter creates steam at the right pace, allowing layers to separate beautifully while achieving golden-brown color.
Never open your oven door during the first 10 minutes of baking. Each time you open the door, the temperature drops significantly, disrupting the delicate layering process. Trust your timer and resist the temptation to peek!
Quality Indicators:
Perfect cookie croissants should:
- Sound hollow when tapped gently on the bottom
- Show visible layer separation when torn
- Shatter slightly when you bite through the crust
- Feel light relative to their size
- Display deep golden-brown color overall
If your croissants aren’t achieving these qualities, consider these adjustments: ensure your oven temperature is accurate, handle the pastry more gently during assembly, or try a different brand of croissants that might have better lamination.
Storage Tips and Freshness Duration
Proper storage ensures your cookie croissants maintain their delicious quality for as long as possible. Follow these guidelines for best results.
Room Temperature Storage:
Cooled cookie croissants store best at room temperature in an airtight container. They’ll maintain good quality for 2-3 days, though they’re absolutely best within the first 24 hours. Never refrigerate these pastries – refrigeration accelerates staling and makes the croissant layers tough and chewy rather than crisp and flaky.
Choose a container slightly larger than your pastries to avoid crushing them. If stacking multiple croissants, place parchment paper between layers to prevent sticking. Store in a cool, dry place away from direct sunlight and heat sources.
Signs of Spoilage:
Always inspect stored pastries before eating. Discard any croissants showing mold, off odors, or unusual texture changes. While rare with properly stored items, these signs indicate spoilage.
Best Practices:
- Cool completely (30-45 minutes) before storing
- Use containers with tight-sealing lids
- Keep away from moisture sources
- Store separately from strongly-flavored foods
- Label containers with date if planning longer storage
Reheating Guidelines
Bringing stored cookie croissants back to their fresh-baked glory requires the right technique. Here’s how to achieve the best results.
Oven Method (Highly Recommended):
Preheat your oven to 325°F – slightly lower than original baking temperature prevents over-browning. Place croissants on a baking sheet and heat for 5-7 minutes until warmed through and the exterior crisps up again. This method best restores that fresh-baked texture and flavor.
For extra crispy results, the final minute can be done at 350°F, but watch carefully to prevent burning. The croissants should feel warm throughout and sound crisp when you tap them gently.
Toaster Oven Method:
Perfect for reheating one or two croissants. Set temperature to 325°F and heat for 4-5 minutes. Toaster ovens often run hotter than indicated, so start checking at 3 minutes. This method works especially well for dessert croissants because the smaller space creates crispier results.
Air Fryer Method:
Preheat your air fryer to 300°F. Place croissants in the basket without overcrowding and heat for 3-4 minutes. The circulating hot air restores crispiness beautifully. This method is ideal when you want maximum crispiness with minimal time.
Microwave Method (Emergency Only):
While convenient, microwaving produces the least desirable results. If you must use a microwave, do so at 50% power in 10-15 second intervals. The microwave can’t restore crispiness and often makes croissants rubbery, so only use this method when absolutely necessary.
Pro Reheating Tips:
Never reheat from frozen – thaw completely first at room temperature. If your reheated croissants seem slightly dry, serve them with a pat of butter or alongside ice cream to add moisture. Reheated pastries taste best when served immediately – they lose quality quickly once they cool down again.
Freezing Instructions
Freezing extends the life of your cookie croissants significantly, allowing you to enjoy bakery-fresh treats whenever cravings strike.
Freezing Fresh-Baked Croissants:
Step 1: Cool completely to room temperature. Freezing warm pastries creates condensation inside packaging, leading to ice crystals and freezer burn.
Step 2: Arrange cooled croissants on a baking sheet in a single layer, ensuring they don’t touch. This prevents them from freezing together into one solid mass.
Step 3: Place the baking sheet in your freezer for 2-3 hours until croissants are frozen solid. This “flash freezing” preserves their shape and texture.
Step 4: Transfer frozen croissants to freezer-safe bags or airtight containers. Remove as much air as possible from bags before sealing. Label with contents and date.
Step 5: Store for up to 2-3 months for best quality. While they remain safe indefinitely when frozen, quality diminishes over time.
Thawing and Serving:
Remove desired number of croissants from freezer and let them thaw at room temperature for 1-2 hours. Never thaw in the microwave, as this creates soggy, tough pastry. Once thawed, reheat using the oven method described above for best results.
For fastest results, you can reheat frozen croissants directly in a 325°F oven for 10-12 minutes, though thawing first produces slightly better texture.
Freezing Unbaked Assembled Croissants:
You can also freeze assembled but unbaked croissants. Follow the same flash-freezing process, then bake directly from frozen, adding 3-4 minutes to the original baking time. This method provides the closest experience to fresh-baked croissants.
By following these freezing guidelines, you can enjoy your homemade bakery treats whenever the mood strikes, with minimal quality loss.
Serving Suggestions and Pairings
The right accompaniments transform good dessert croissants into an unforgettable experience. Let’s explore pairing possibilities that highlight their buttery, sweet flavors.
Perfect Beverage Partners:
Coffee Pairings: These croissants shine alongside rich espresso, smooth lattes, or robust French press coffee. The coffee’s slight bitterness balances the pastry’s sweetness perfectly. For something special, try pairing with a vanilla latte or caramel macchiato – the flavors complement beautifully.
Tea Selections: Earl Grey’s bergamot notes pair wonderfully with chocolate variations, while chai spices complement peanut butter versions. English breakfast tea provides a classic, neutral backdrop that lets the croissant flavors shine. For something lighter, try green tea or herbal fruit infusions.
Hot Chocolate: Rich hot chocolate alongside cookie croissants creates pure comfort food heaven. This pairing works especially well on cold mornings or as an afternoon pick-me-up.
Delicious Accompaniments:
Ice Cream and Gelato: Serving warm croissants with a scoop of vanilla, chocolate, or coffee ice cream creates incredible temperature and texture contrast. The cold, creamy ice cream melting against warm, flaky pastry is absolutely divine. Try matching ice cream flavors to your croissant variation for harmonious combinations.
Fresh Fruit: Balance the richness with fresh berries, sliced strawberries, or seasonal fruit. The fruit’s natural acidity cuts through the butter and sugar, creating a more refreshing eating experience. Macerated berries with a touch of sugar work particularly well.
Whipped Cream: Light, sweetened whipped cream adds luxurious richness without overwhelming. Flavored whipped cream (vanilla, cinnamon, or almond) takes things up another notch.
Sauce Drizzles: Chocolate ganache, caramel sauce, berry coulis, or lemon curd make stunning presentations and add complementary flavors. Drizzle artfully over plated croissants for restaurant-quality presentation.
Occasion-Specific Serving Ideas:
Elegant Brunch: Dust with powdered sugar, arrange on a pretty platter with fresh flowers, and serve alongside champagne or mimosas.
Casual Coffee Date: Serve warm with excellent coffee and good conversation. Keep it simple and let the pastries speak for themselves.
Dessert Course: Plate individually with ice cream, fresh berries, and artistic sauce drizzle. Garnish with fresh mint leaves for color.
Afternoon Tea: Cut into smaller portions for easy finger-food serving. Pair with a selection of teas for a refined experience.
Special Breakfast: Serve with fresh fruit salad, crispy bacon, and freshly squeezed juice for a memorable morning meal.
Presentation Tips:
- Dust with powdered sugar just before serving for elegant appearance
- Garnish plates with fresh mint, edible flowers, or berry clusters
- Serve on warm plates to maintain temperature longer
- Consider individual plating for special occasions
- Use contrasting plate colors to make golden croissants pop visually
These are just starting points – feel free to create your own signature serving style!
Conclusion: Elevate Your Baking Game with Cookie Croissants
You’ve now mastered everything needed to create spectacular cookie croissants that rival any upscale bakery. These stunning pastries combine buttery, flaky layers with sweet, gooey centers, delivering an eating experience that never fails to impress. Whether you’re baking for family breakfast, entertaining guests, or simply treating yourself, these versatile pastries adapt beautifully to any occasion.
The true magic of cookie croissants lies in their accessibility. Despite their impressive appearance and complex flavor profile, they require minimal time and basic ingredients. In less than 30 minutes, you can create bakery-quality results that’ll have everyone convinced you trained at a Parisian pâtisserie.
Experiment freely with the variations we’ve explored – from classic chocolate chip to creative seasonal flavors. Each combination offers something unique while maintaining that signature contrast between crispy exterior and soft interior that makes these pastries so addictive. Don’t be afraid to develop your own signature variation that reflects your personal taste preferences.
Ready to start your cookie croissant journey? Gather your ingredients, preheat that oven, and prepare to amaze yourself with what you can create. These bakery treats prove that extraordinary results don’t require extraordinary effort – just good ingredients, proper technique, and a bit of enthusiasm.
I’d love to hear about your experience! Drop a comment below sharing which variation you tried first, rate this recipe to help fellow bakers, and tag your creations on social media so we can celebrate your success together. Don’t forget to explore our other dessert recipes for more inspiration – your baking adventure is just beginning!
FAQ
Can I freeze cookie croissants successfully?
Absolutely! These freeze beautifully for up to 2-3 months. Flash freeze them individually on a baking sheet first, then transfer to freezer bags. Thaw at room temperature and reheat in a 325°F oven for 5-7 minutes to restore that fresh-baked quality.
What if I don’t have prepared cookie dough available?
No problem! Make simple cookie dough from scratch using butter, sugar, flour, egg, and your favorite mix-ins. Just ensure you chill it for at least 30 minutes before using. Homemade dough actually allows you to control sweetness levels and customize flavors exactly to your preferences.
Can I prepare these in advance for morning entertaining?
Definitely! Assemble filled croissants and refrigerate up to 4 hours before baking. This works perfectly for brunch entertaining – prep the night before, then bake fresh in the morning. Your kitchen will smell amazing and guests will be incredibly impressed.
How do I make these less sweet?
Several options work well: use unsweetened or reduced-sugar cookie dough, decrease the filling amount slightly, or choose less sweet dough varieties like peanut butter. Adding a sprinkle of sea salt before baking also helps balance sweetness. Serving alongside unsweetened coffee or tea provides additional balance.
What makes cookie croissants special compared to regular pastries?
The textural contrast is truly unique – crispy, shattering pastry layers give way to warm, gooey cookie centers. This combination delivers multiple textures and flavors in each bite, creating a more complex and satisfying eating experience than either component alone could provide.
Where did this recipe originate?
Cookie croissants emerged from innovative Parisian bakeries where pastry chefs experimented with combining classic French technique with American cookie culture. The trend exploded through social media, with bakeries worldwide creating their own interpretations of this brilliant fusion.
Why do home bakers love this recipe?
It delivers professional results with minimal effort and basic ingredients. The impressive appearance makes it perfect for entertaining, while the simple technique ensures consistent success even for beginners. Plus, the endless variation possibilities keep the recipe exciting no matter how many times you make it.
What are the absolute essential ingredients?
You need just two things: quality butter croissants and cookie dough. Everything else is optional enhancement. This simplicity makes the recipe incredibly accessible while still producing spectacular results that look and taste gourmet.
What equipment is absolutely necessary?
Basic baking essentials: an oven, baking sheet, parchment paper, and serrated knife. That’s it! Most home kitchens are already equipped with everything needed. No specialized tools or expensive equipment required.
What’s the step-by-step process in brief?
Slice croissants horizontally, fill with cookie dough, replace tops, and bake at 375°F for 12-14 minutes until golden. The entire process takes under 30 minutes from start to finish, making it perfect for busy schedules.
What creative variations work best?
Chocolate chip remains classic and beloved, but peanut butter, double chocolate, sugar cookie, and Nutella variations all produce excellent results. Seasonal flavors like pumpkin spice or peppermint add festive touches. Experiment to discover your favorites!
How do I achieve perfect flaky texture?
Use fresh croissants, handle gently during assembly, ensure proper oven temperature, and avoid overbaking. These four factors determine whether you get crispy, flaky perfection or disappointing, tough results.
What’s the best storage method?
Room temperature in airtight containers maintains quality for 2-3 days. Never refrigerate, as this toughens the delicate layers. For longer storage, freeze for up to 3 months following proper freezing procedures.
What are the best serving suggestions?
These pair beautifully with coffee, tea, or hot chocolate. For dessert service, add ice cream, fresh berries, or sauce drizzles. They work wonderfully for breakfast, brunch, afternoon snacks, or elegant dessert courses – incredibly versatile!
Have You Tried Our Recipe?
There are no reviews yet. Be the first one to write one.