
Yuzu Cheesecake Recipe: A Citrusy Japanese-Inspired Dessert
Welcome to my kitchen! Today, I’m sharing my yuzu cheesecake recipe, a dessert that’s always a hit at dinner parties and family gatherings. I first tried yuzu cheesecake at a small Japanese bakery in Seattle three years ago, and the bright, aromatic citrus flavor completely captivated me. That first bite – creamy, tangy, and absolutely refreshing – inspired me to recreate it at home. After dozens of trials (and plenty of taste-testing), I’ve perfected this recipe that balances the unique floral notes of yuzu with the rich creaminess of classic cheesecake.
This recipe is perfect for anyone who loves easy yuzu cheesecake with glaze and wants something that looks impressive but doesn’t require professional baking skills. The best part? You can make this yuzu cheesecake from scratch without any intimidating techniques. Whether you’re a cheesecake enthusiast looking to try something different or someone who appreciates Japanese-inspired desserts, this citrusy treat will become your new favorite. The combination of a buttery graham cracker crust, silky cream cheese filling infused with yuzu juice, and a glossy yuzu glaze creates layers of flavor that are simply unforgettable. Let’s dive in and see why this yuzu cheesecake recipe is a must-try!
Table of Contents
Quick Recipe Facts
Prep Time: 30 minutes
Cook Time: 55 minutes
Cooling & Chilling Time: 6 hours (or overnight)
Total Time: 7 hours 25 minutes
Servings: 10-12 slices
Difficulty: Intermediate
Calories: ~320 per slice
This recipe is surprisingly manageable once you get the hang of it – perfect for weekend baking projects when you want to impress!
Ingredients
For this yuzu cheesecake recipe, you’ll need the following ingredients. If you can’t find fresh yuzu, bottled yuzu juice works beautifully and is available at most Asian grocery stores or online. You can swap regular graham crackers with ginger snaps for a spicier crust, or use digestive biscuits for a slightly less sweet base. The sour cream topping adds a professional bakery-style finish, but you can skip it if you prefer a simpler presentation.
For the Crust:
- 2 cups (200g) graham cracker crumbs (about 14 crackers)
- ¼ cup (50g) granulated sugar
- 7 tablespoons (100g) unsalted butter, melted
- Pinch of salt
For the Cheesecake Filling:
- 24 oz (680g) cream cheese, softened to room temperature
- 1 cup (200g) granulated sugar
- 3 large eggs, room temperature
- ⅓ cup (80ml) yuzu juice (fresh or bottled)
- 2 tablespoons yuzu zest (about 2-3 yuzu fruits)
- 1 teaspoon vanilla extract
- ¼ cup (60ml) heavy cream
- 2 tablespoons all-purpose flour
For the Sour Cream Topping:
- 1 cup (240ml) sour cream
- 3 tablespoons granulated sugar
- 1 tablespoon yuzu juice
- ½ teaspoon vanilla extract
For the Yuzu Glaze:
- ½ cup (120ml) yuzu juice
- ⅓ cup (65g) granulated sugar
- 1 tablespoon cornstarch
- 2 tablespoons water
- 1 teaspoon yuzu zest
Instructions
Step 1: Prepare Your Pan and Preheat
Preheat your oven to 325°F (165°C). This moderate temperature helps your yuzu cheesecake bake evenly without cracking. Wrap the outside of a 9-inch springform pan with two layers of heavy-duty aluminum foil to prevent water from seeping in during the water bath. Grease the inside of the pan lightly with butter or cooking spray.
Step 2: Make the Crust
In a medium bowl, combine graham cracker crumbs, sugar, and salt. Pour in the melted butter and mix with a fork until the mixture resembles wet sand. Press the crumb mixture firmly into the bottom of your prepared pan, using the bottom of a measuring cup to create an even, compact layer. Bake the crust for 10 minutes, then remove and let it cool while you prepare the filling.
Step 3: Beat the Cream Cheese
In a large mixing bowl, beat the softened cream cheese with an electric mixer on medium speed for 2-3 minutes until completely smooth and creamy. Scrape down the sides of the bowl frequently – this ensures no lumps remain. For a silky yuzu cheesecake from scratch, taking your time with this step is crucial.
Step 4: Add Sugar and Mix
Add the sugar to the cream cheese and beat for another 2 minutes until light and fluffy. The mixture should look pale and airy. This is where the magic starts to happen!
Step 5: Incorporate Eggs Gently
Add eggs one at a time, mixing on low speed after each addition. I like using a wooden spoon for this part; it prevents overbeating, which can create too much air and cause cracks. Mix just until each egg is incorporated before adding the next.
Step 6: Add Yuzu and Flavors
Pour in the yuzu juice, yuzu zest, vanilla extract, and heavy cream. Sprinkle the flour over the mixture. Beat on low speed until just combined – about 30 seconds. Don’t overbeat! The batter should be smooth and pourable. The yuzu juice adds that signature tangy brightness that makes this dessert so special.
Step 7: Pour and Prepare Water Bath
Pour the filling over the cooled crust and smooth the top with a spatula. Place the springform pan inside a larger roasting pan. Carefully pour hot water into the roasting pan until it reaches halfway up the sides of the springform pan. This water bath (bain-marie) ensures gentle, even baking.
Step 8: Bake
Bake for 55-65 minutes. The cheesecake is done when the edges are set but the center still jiggles slightly when you gently shake the pan – about a 2-inch circle in the middle should wobble. It will firm up as it cools. For a perfect easy yuzu cheesecake with glaze, don’t overbake!
Step 9: Add Sour Cream Topping (Optional but Recommended)
While the cheesecake bakes, whisk together all sour cream topping ingredients. When the cheesecake comes out of the oven, let it sit for 5 minutes, then gently spread the sour cream mixture over the top. Return to the oven for 10 minutes. This creates a beautiful, tangy layer that complements the yuzu perfectly.
Step 10: Cool Gradually
Turn off the oven and crack the door open slightly. Let the cheesecake cool in the oven for 1 hour. This gradual temperature change prevents cracking. Remove from the oven and water bath, take off the foil, and let it cool to room temperature on a wire rack (about 2 hours). Cover with plastic wrap and refrigerate for at least 4 hours or overnight.
Step 11: Make the Yuzu Glaze
In a small saucepan, whisk together yuzu juice and sugar. In a small bowl, mix cornstarch with water to create a slurry. Bring the yuzu mixture to a simmer over medium heat, then whisk in the cornstarch slurry. Cook, stirring constantly, for 2-3 minutes until the glaze thickens and becomes glossy. Remove from heat, stir in yuzu zest, and let cool to room temperature.
Step 12: Glaze and Serve
Once your yuzu cheesecake is fully chilled and the glaze has cooled, run a thin knife around the edge of the pan and release the springform. Drizzle the yuzu glaze over the top, letting it cascade down the sides naturally, or spread it evenly with an offset spatula. Refrigerate for another 30 minutes to set the glaze before slicing.
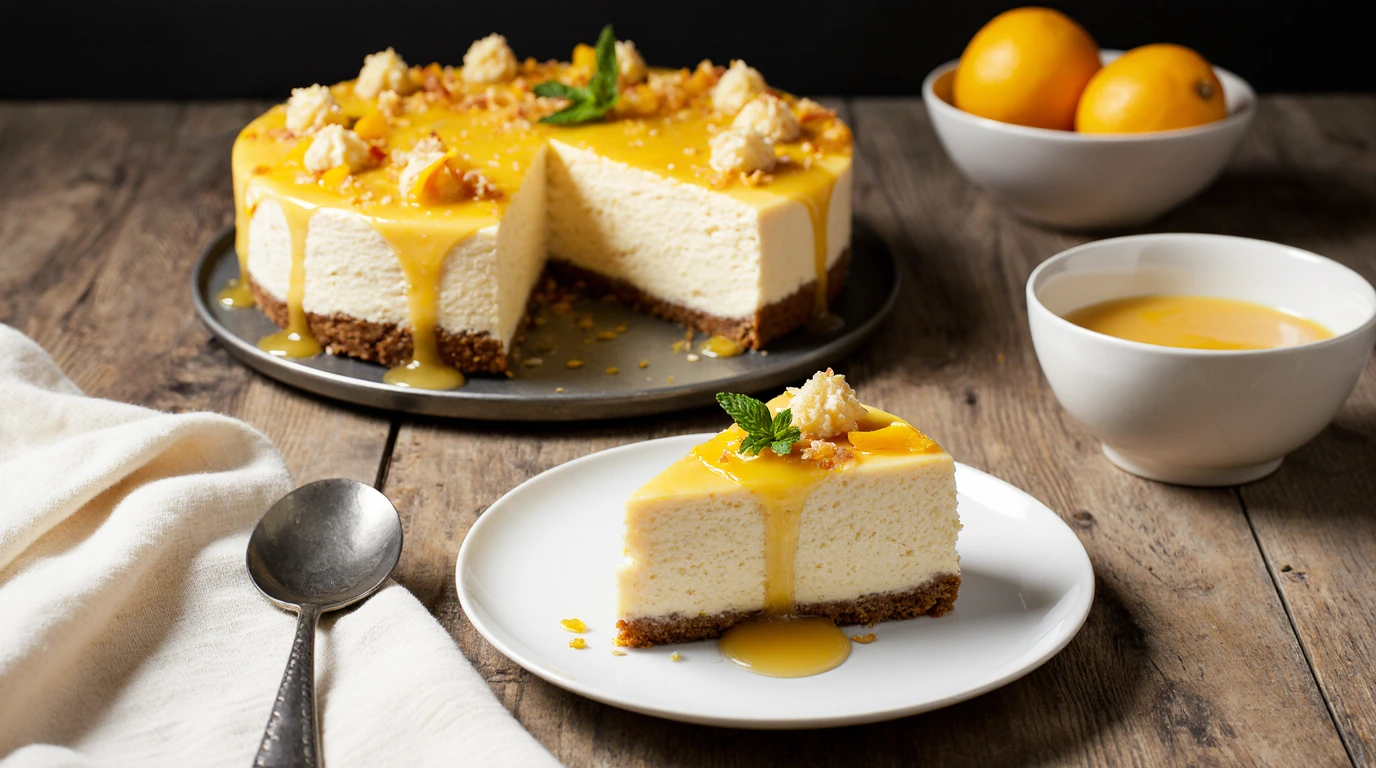
A bright and creamy yuzu cheesecake from scratch, topped with glossy citrus glaze.
Pro Tips
Tip 1: Don’t skip bringing ingredients to room temperature – cold cream cheese creates lumps, and cold eggs can cause the batter to curdle. Set everything out 1-2 hours before baking.
Tip 2: Use a sharp knife dipped in hot water and wiped clean between each cut for picture-perfect slices. This prevents the filling from sticking to the blade.
Tip 3: If you’re making a no-bake yuzu cheesecake dessert version, skip the baking steps, add 2 tablespoons of unflavored gelatin to the filling, and let it set in the refrigerator for 6-8 hours. The texture will be lighter and mousselike.
Tip 4: Can’t find yuzu? Substitute with a combination of lemon and lime juice (use 2 parts lemon to 1 part lime) plus a tiny bit of orange zest. It won’t be exactly the same, but it creates a complex citrus flavor.
Tip 5: Check your cheesecake 5 minutes before the timer goes off. Every oven is different, and you want to catch it at that perfect jiggly-but-set stage.
Serving Suggestions
Serve your yuzu cheesecake chilled, directly from the refrigerator. The cool, creamy texture contrasts beautifully with hot beverages. Pair it with Japanese green tea, a strong cup of coffee, or even champagne for an elegant dessert course. For added visual appeal, garnish each slice with fresh berries (blueberries or raspberries work wonderfully), a small dollop of whipped cream, or candied yuzu peel if you’re feeling fancy. Some people love adding a mint leaf for a pop of color. These serving ideas elevate your yuzu cheesecake dessert experience and make it Instagram-worthy!
Storage & Reheating
Store your yuzu cheesecake recipe in an airtight container or cover the springform pan tightly with plastic wrap. It will stay fresh in the refrigerator for up to 5 days. Unlike many cakes, cheesecake actually benefits from refrigeration – it keeps the texture firm and the flavors bright. You can also freeze individual slices wrapped tightly in plastic wrap and aluminum foil for up to 2 months. Thaw overnight in the refrigerator before serving. There’s no need to reheat this dessert; it’s meant to be enjoyed cold. Leftover yuzu cheesecake stays creamy and delicious when stored properly – though in my experience, there are rarely leftovers!
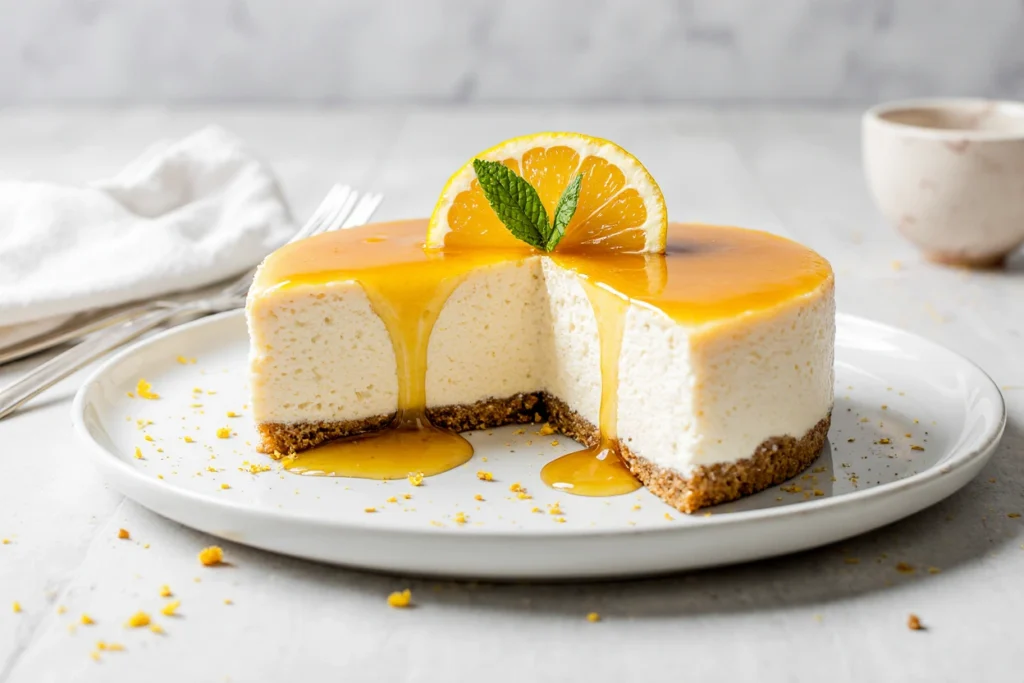
Layers of flavor in this yuzu cheesecake from scratch—buttery crust, silky filling, and vibrant glaze.
Health & Nutrition Info
One slice of this yuzu cheesecake contains approximately 320 calories, depending on portion size. While this is an indulgent dessert, you can make some healthier swaps if desired. Use reduced-fat cream cheese (though the texture will be slightly less creamy), substitute half the sugar with a natural sweetener like monk fruit or stevia, or use Greek yogurt in place of some of the sour cream. For a gluten-free version, simply use gluten-free graham crackers or almond flour for the crust. This healthier yuzu cheesecake with sour cream topping option is perfect for weekend treats when you want something special without going completely off track. The yuzu itself is rich in vitamin C and adds natural antioxidants to each slice!
Conclusion
This yuzu cheesecake recipe combines the best of both worlds: the comforting creaminess of a classic New York-style cheesecake with the bright, aromatic essence of Japanese yuzu citrus. It’s a showstopper dessert that tastes like you spent hours in a professional kitchen, but the steps are actually quite manageable with a little patience and attention to detail. The tangy-sweet flavor profile makes it perfect for spring and summer gatherings, holiday celebrations, or any time you want to impress your guests with something unique and memorable.
I hope you love this recipe as much as my family and friends do! Try this yuzu cheesecake and let me know how it turned out in the comments below. Did you add any creative twists? I’d love to hear about your experience! Don’t forget to rate this recipe and share photos on social media – tag me so I can see your beautiful creations. If you enjoyed this recipe, check out my other Japanese-inspired desserts like matcha tiramisu and black sesame panna cotta. Happy baking!
FAQ
Can I freeze this yuzu cheesecake?
Yes! Your yuzu cheesecake can be frozen for up to 2 months. Wrap individual slices tightly in plastic wrap, then in aluminum foil to prevent freezer burn. Thaw overnight in the refrigerator before serving. The texture remains remarkably creamy after freezing.
What if I don’t have yuzu juice?
If you can’t find yuzu, create a substitute using ⅔ fresh lemon juice and ⅓ fresh lime juice, plus a small amount of grated orange zest. While it won’t replicate yuzu’s unique floral notes exactly, it creates a complex, bright citrus flavor that’s still delicious.
Can I make this cheesecake ahead of time?
Absolutely! In fact, cheesecake tastes better when made a day ahead. The flavors meld together beautifully, and the texture becomes even creamier. You can prepare this easy yuzu cheesecake with glaze up to 3 days in advance – just add the glaze on the day you plan to serve it for the freshest appearance.
How can I prevent my cheesecake from cracking?
Follow these key steps: don’t overbeat the batter (especially after adding eggs), use a water bath for even heating, avoid opening the oven door during baking, and cool the cheesecake gradually. The gradual cooling in a turned-off oven is crucial for preventing those unsightly cracks!
Can I adjust the sweetness?
Yes! If you prefer a less sweet dessert, reduce the sugar in the filling to ¾ cup. Yuzu is already quite tart, so the cheesecake will still have plenty of flavor. You can also reduce the sugar in the glaze to ¼ cup for a more sophisticated, less candied finish.
What’s the difference between this and a regular cheesecake?
The yuzu juice and zest transform the classic cheesecake into something lighter and more refreshing. Where traditional cheesecake can feel heavy, the citrus notes from yuzu cut through the richness and create a bright, almost floral flavor that’s perfect for people who find regular cheesecake too dense. The glaze also adds a professional touch that takes this yuzu cheesecake from scratch to the next level!
Have You Tried Our Recipe?
There are no reviews yet. Be the first one to write one.