
Easy Black Forest Cake Recipe with Cake Mix — So Moist, Nobody Will Believe It Came from a Box!
A Showstopping Cake That Starts With a Box
Let me be real with you — I used to be a little embarrassed about using a cake mix. I thought from-scratch bakers would look down their flour-dusted noses at me. Then I made this easy black forest cake recipe with cake mix for my sister’s birthday, and every single person at the table asked me for the recipe. That was the day I stopped apologizing for shortcuts.
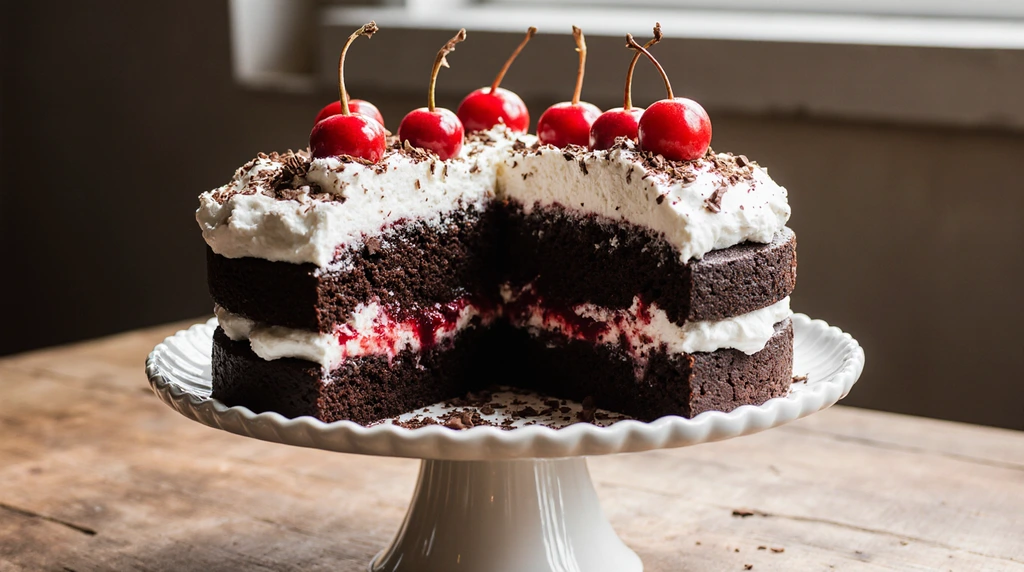
Black Forest cake — layers of rich chocolate, billowy whipped cream, and jewel-bright cherries — looks like it came straight from a German bakery. And honestly? With this recipe, it tastes like it did too. The secret is that a box of chocolate cake mix gives you a perfectly moist, deeply chocolatey base every single time, without the fuss of measuring cocoa and flour and wondering if you got the ratios right.
Whether you’re making this for a birthday, a holiday dinner, or just a Tuesday when you need something extraordinary, this black forest cake recipe with cake mix is your answer. It comes together in under an hour (plus a little chill time), uses ingredients you can grab at any grocery store, and delivers that classic black forest cake with cherry pie filling look and flavor that everyone loves.
Let’s get into it!
Table of Contents
Quick Recipe Facts
- Prep Time : 20 Minutes
- Cook Time : 35 Minutes
- Total Time : ~55 minutes (plus 1 hour chilling)
- Servings : 12 slices
- Difficulty : Easy
- Calories : ~380 per slice
This recipe is surprisingly quick and easy — perfect for busy weeknights or last-minute celebrations!
Ingredients
For the Cake Layers
- 1 box (15.25 oz) chocolate cake mix (devil’s food works great)
- 3 large eggs, room temperature
- 1 cup whole milk (or buttermilk for extra moisture)
- 1/2 cup vegetable oil
- 1 teaspoon pure vanilla extract
- 1/4 cup strong brewed coffee, cooled (optional but deepens the chocolate flavor)
For the Cherry Filling
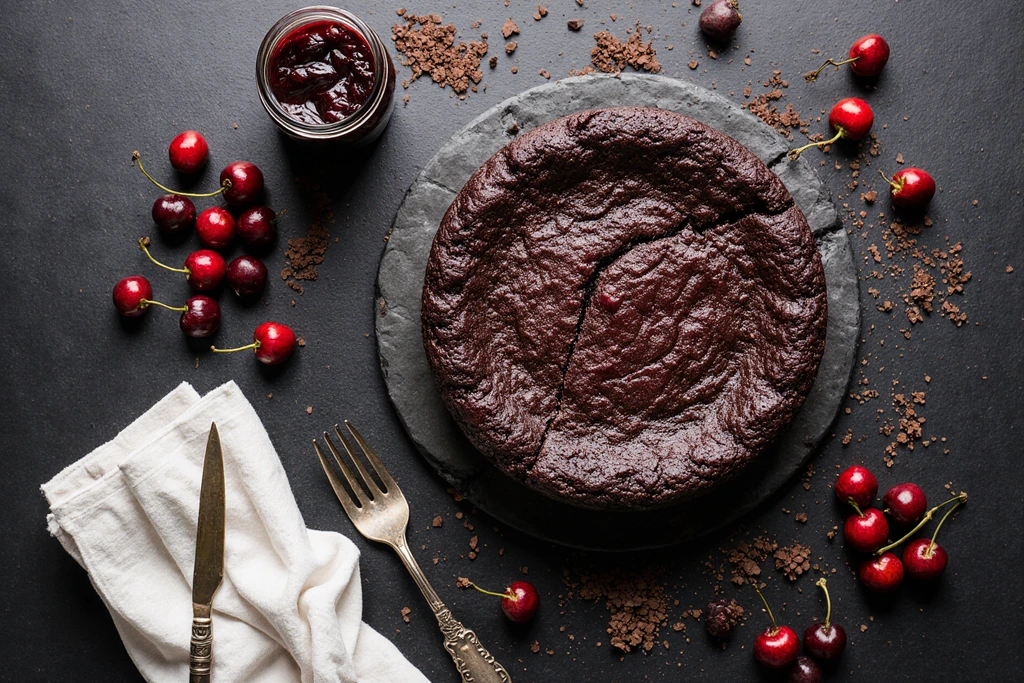
- 1 can (21 oz) cherry pie filling
- 1 tablespoon kirsch (cherry brandy) or 1 teaspoon almond extract — optional but lovely
For the Whipped Cream Frosting
- 2 cups heavy whipping cream, very cold
- 3 tablespoons powdered sugar
- 1 teaspoon vanilla extract
For Decoration
- Fresh or maraschino cherries (about 12)
- Dark or semi-sweet chocolate shavings or curls
- Optional: a dusting of cocoa powder
Swap tip: For a dairy-free version, use full-fat coconut cream instead of heavy whipping cream. It whips up beautifully and adds a subtle richness that works perfectly with the cherries. For a gluten-free black forest cake, simply use your favorite 1:1 gluten-free chocolate cake mix.
Instructions
Step 1: Bake the Cake Layers
- Preheat your oven to 350°F. Grease and flour two 9-inch round cake pans — don’t skip this step or you’ll be prying cake out of the pan later (speaking from experience).
- In a large bowl, combine the chocolate cake mix, eggs, milk, oil, vanilla, and coffee if using. Beat with a hand mixer on medium speed for about 2 minutes, until smooth and well combined. The batter will be thick and glossy.
- Divide the batter evenly between your prepared pans. For a really even bake, use a kitchen scale — each pan should hold about the same weight.
- Bake for 28–33 minutes, or until a toothpick inserted in the center comes out with just a few moist crumbs. Start checking at 28 minutes — every oven is different!
- Let the cakes cool in the pans for 10 minutes, then turn them out onto wire racks and cool completely. This part is non-negotiable — warm cake + whipped cream = a melted mess.
Step 2: Prepare the Cherry Filling
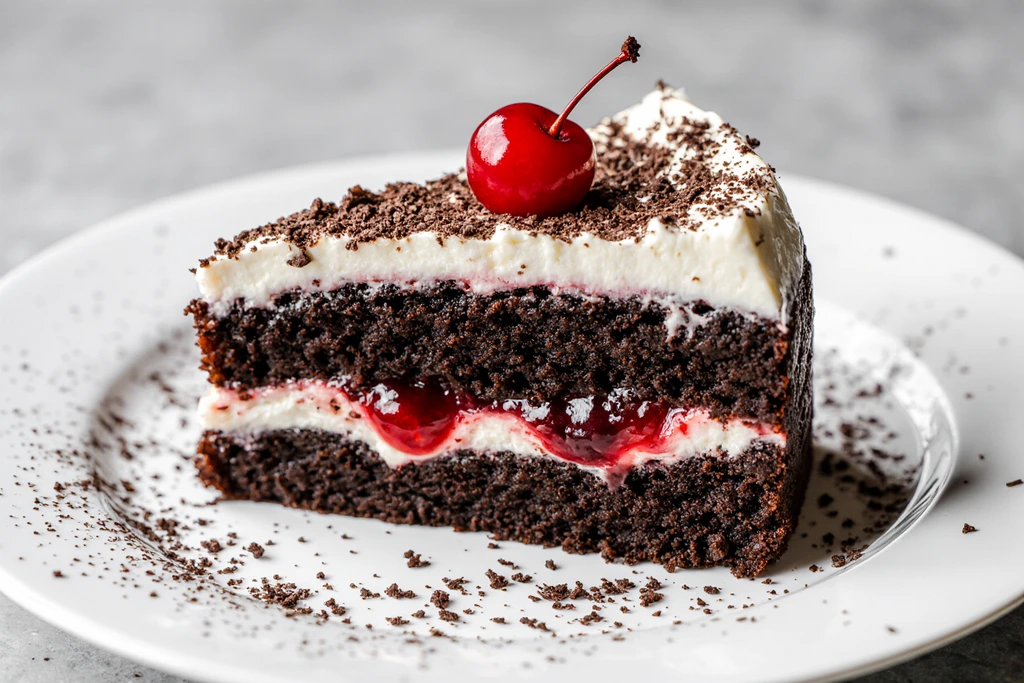
- Pour the cherry pie filling into a bowl. Stir in the kirsch or almond extract if using. Set aside. This is your classic black forest cake with cherry pie filling layer — simple, sweet, and perfectly tart.
Step 3: Make the Whipped Cream
- Make sure your bowl and beaters are very cold — pop them in the freezer for 10 minutes if your kitchen is warm. Cold tools = stiff peaks.
- Beat the heavy cream on medium-high speed until it starts to thicken. Add the powdered sugar and vanilla, then beat to stiff peaks. You want it firm enough to hold its shape when you slice the cake.
Step 4: Assemble the Cake
- Place one cake layer on your serving plate or cake board. Use a long serrated knife to level the top if it domed — a flat surface makes stacking much easier.
- Spread a generous layer of whipped cream over the first cake layer, leaving about a 1-inch border around the edge.
- Spoon the cherry filling over the whipped cream center, keeping it away from the edges so it doesn’t ooze out when you add the top layer.
- Place the second cake layer on top and press down gently. Frost the top and sides of the cake with the remaining whipped cream.
- Decorate with chocolate shavings, fresh or maraschino cherries, and a light dusting of cocoa powder if you like. Pop the finished cake in the refrigerator for at least 1 hour before serving — this gives everything time to set and the flavors to meld beautifully.
Pro Tips for the Best Black Forest Cake
- Don’t rush the cooling. I know it’s tempting, but putting whipped cream on a warm cake will make it slide right off. Give those layers a full cool.
- Use room temperature eggs. Cold eggs don’t incorporate as smoothly into the batter, which can affect the texture of your cake. Just pull them out 30 minutes before you start.
- Make it ahead. This cake actually gets better overnight in the fridge — the layers soak into each other and everything becomes more cohesive and delicious.
- Want a richer chocolate flavor? Add a tablespoon of instant espresso powder to the cake batter. It won’t make your cake taste like coffee, but it deepens the chocolate in the most wonderful way.
- For taller, more impressive layers, use three 8-inch pans instead of two 9-inch — just reduce the bake time by about 5 minutes and keep an eye on them.
Serving Suggestions
This moist black forest chocolate cake recipe is a showstopper all on its own, but here are a few ways to make it even more special:
- Serve slices slightly chilled — the whipped cream is at its best when it’s cold and just barely firm.
- Pair with a cup of strong black coffee or espresso to balance the sweetness.
- Add a small scoop of vanilla bean ice cream on the side for an indulgent dessert plate.
- For an elegant touch, drizzle a little chocolate ganache over each slice just before serving.
Storage & Make-Ahead Tips
Cover leftover black forest cake loosely with plastic wrap or store in a cake keeper in the refrigerator. It keeps well for up to 3 days — the flavors actually improve by day two.
To make ahead: Bake the cake layers up to 2 days in advance, wrap tightly in plastic wrap, and refrigerate. Assemble the day before or the morning of your event.
To freeze: Wrap unfrosted cake layers individually in plastic wrap and then foil. Freeze for up to 2 months. Thaw overnight in the refrigerator before assembling. Whipped cream does not freeze well, so always make it fresh.
Health & Nutrition Notes
Each slice of this easy black forest cake is approximately 380 calories, depending on portion size and the specific cake mix you use. Here are a few swaps to lighten things up:
- Reduce sugar in the whipped cream or use a sugar-free powdered sweetener.
- Use a reduced-sugar or light cherry pie filling.
- For a gluten-free black forest cake, substitute a 1:1 gluten-free cake mix — the result is just as moist and delicious.
- Swap whole milk for oat milk or almond milk in the cake batter with minimal difference in texture.
This recipe can also be made dairy-free with coconut cream for the frosting and a dairy-free cake mix. It’s a surprisingly flexible recipe for a cake that looks this impressive!
Let’s Wrap This Up
There you have it — the easiest, most impressive chocolate cherry dessert you’ll ever pull off on a weeknight. This easy black forest cake recipe with cake mix proves that great baking doesn’t have to be complicated. It just has to be delicious.
The layers of moist chocolate cake, sweet-tart cherry filling, and clouds of whipped cream come together into something that looks like it took you all day — but we know the truth. And honestly? That’s the best kind of recipe.
I’d love to know how yours turned out! Drop a comment below, rate the recipe, and if you share it on Pinterest or Instagram, tag me so I can see your gorgeous creation. And if you’re in a baking mood, check out my other easy dessert recipes — there are plenty more shortcuts to deliciousness where this came from.
FAQ
Can I freeze this black forest cake?
Yes! Freeze the unfrosted cake layers (wrapped well in plastic and foil) for up to 2 months. Thaw in the fridge overnight and assemble fresh. Do not freeze the assembled cake — whipped cream doesn’t survive the freezer well.
What if I don’t have cherry pie filling?
You can use fresh pitted cherries simmered with a little sugar and cornstarch to make a simple compote, or use jarred sour cherries drained well. The canned filling is convenient and consistent, but fresh options work beautifully too.
Can I make this cake ahead of time?
Absolutely — and I actually recommend it. Assembled and refrigerated overnight, this easy black forest cake recipe with cake mix tastes even better the next day. The layers meld together and the whipped cream becomes almost mousse-like in texture.
How do I get clean slices?
Use a sharp knife dipped in hot water and wiped dry between each cut. This melts through the cream cleanly and gives you those beautiful, bakery-style slices.
Can I use Cool Whip instead of homemade whipped cream?
You can! A black forest cake with Cool Whip and cake mix is even quicker to put together. Use two tubs of Cool Whip in place of the homemade whipped cream. The texture will be slightly firmer and it holds up better if the cake needs to sit out for a while at a party.
Can I add a chocolate glaze?
Yes, and it’s gorgeous. Melt 4 oz of dark chocolate with 1/4 cup heavy cream and let it cool slightly, then drizzle it over the top of the assembled cake before decorating. It adds richness and makes the presentation even more dramatic.
Have You Tried Our Recipe?
There are no reviews yet. Be the first one to write one.