

Twisted Churro Cheesecake: Where Spanish Street Food Meets New York Elegance
Forget everything you know about churro cheesecake. Most recipes take shortcuts with crescent rolls and call it a day. Not this one. I’m showing you how to create an authentic churro-inspired crust from scratch that actually tastes like the real deal, paired with a luxurious dulce de leche cheesecake filling that’ll make you forget about the boring vanilla versions.
After testing seventeen different versions (yes, seventeen!), I finally cracked the code. This recipe delivers crispy, pipeable churro layers with that signature ridged texture, wrapped around a caramelized cream cheese center. It’s more work than the five-minute versions, but the payoff? Absolutely worth every extra minute. This isn’t your standard throw-it-together churro cheesecake. It requires patience, precision, and a willingness to actually pipe dough. But here’s the thing: when you serve this at your next gathering and watch people’s faces light up at that first bite—the crispy, spiced churro giving way to smooth dulce de leche cream—you’ll understand why we don’t take shortcuts with the good stuff.
Table of Contents
Quick Recipe Facts
- Prep Time: 35 minutes (active time)
- Cook Time: 45 minutes
- Total Time: 5 hours 20 minutes (including 4 hours chilling)
- Servings: 12 generous portions
- Difficulty: Intermediate
- Best Served: Chilled with a coffee liqueur drizzle
This recipe actually improves with age. Make it 2 days ahead and keep refrigerated—the flavors deepen and meld beautifully.
Ingredients
For this Twisted Churro Cheesecake, you’ll need the following ingredients. You can swap regular butter with plant butter for a dairy-free churro base version. Dulce de leche adds a rich, caramel flavor that makes your cheesecake luxurious and delicious.
For the Churro Base Layer:
- 1 cup whole milk
- 6 tablespoons unsalted butter, cubed
- 2 tablespoons light brown sugar
- ½ teaspoon fine sea salt
- 1¼ cups all-purpose flour
- 3 large eggs, room temperature
- 1 teaspoon Mexican vanilla extract
For the Cinnamon-Cardamom Sugar:
- ¾ cup granulated sugar
- 2½ tablespoons ground cinnamon
- ½ teaspoon ground cardamom (game-changer!)
- Pinch of cayenne pepper (trust me)
For the Dulce de Leche Filling:
- 24 oz cream cheese (three 8-oz blocks), room temperature
- ⅔ cup dulce de leche (store-bought or homemade)
- 3 large eggs
- ⅓ cup heavy cream
- 2 tablespoons cornstarch
- 1 tablespoon fresh lemon juice
- 1 teaspoon espresso powder
For the Finishing Touch:
- 4 tablespoons melted butter
- Extra cinnamon-cardamom sugar
- Optional: Dark chocolate ganache for drizzling
Instructions
Part 1: Building Your Churro Foundation
Step 1: Create the Choux Base
In a heavy-bottomed saucepan, combine milk, butter, brown sugar, and salt. Bring to a rolling boil over medium-high heat. The moment it boils, remove from heat and dump in all your flour at once. Stir vigorously with a wooden spoon until a smooth ball forms and pulls away from the pan sides.
Step 2: The Critical Cooling Phase
Transfer the dough to your stand mixer bowl (or use a hand mixer). Let it cool for exactly 5 minutes—this prevents scrambling your eggs. Beat on medium speed while adding eggs one at a time. Wait until each egg fully incorporates before adding the next. Mix in vanilla. Your dough should be glossy and hold soft peaks when lifted.
Step 3: Pipe Like a Pro
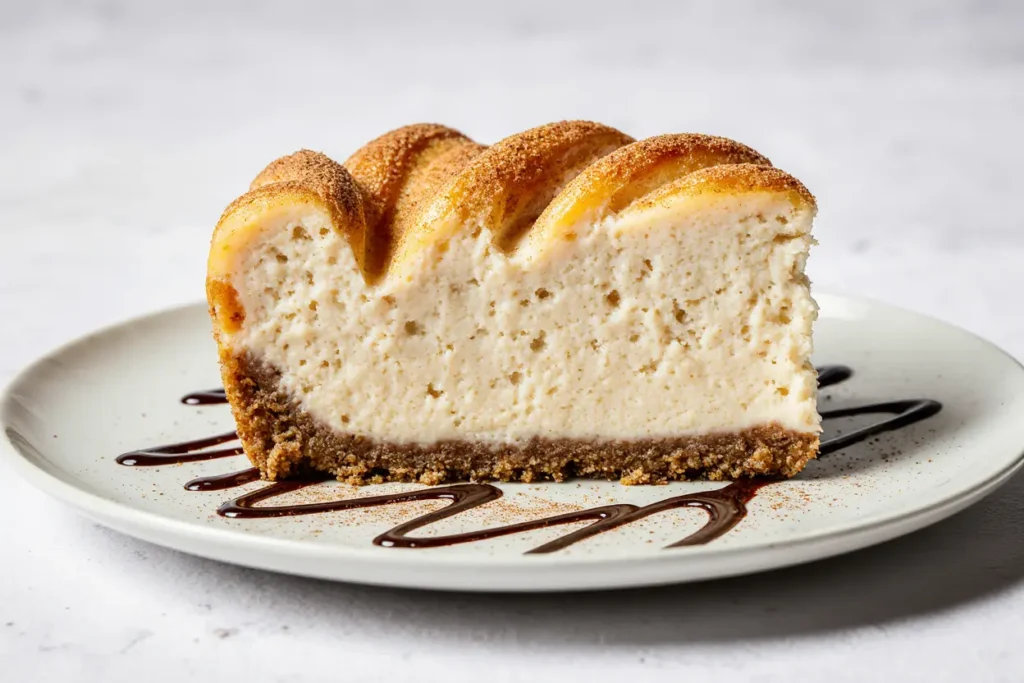
Line a 9-inch springform pan with parchment paper, extending up the sides. Load your dough into a piping bag fitted with a large star tip. Pipe concentric circles starting from the center, creating a spiral pattern that covers the entire pan bottom. Pipe a second layer around the edges, building up the walls about 1 inch high.
Step 4: The First Bake
Bake at 400°F for 20 minutes until puffed and golden. Don’t open the oven door! Reduce temperature to 350°F and bake another 8 minutes. Remove and immediately brush with melted butter, then shower with half your cinnamon-cardamom sugar. Let cool completely.
Part 2: Crafting the Dulce de Leche Center
Step 5: Whip Up the Filling
Beat cream cheese on medium speed for 3 minutes until impossibly fluffy—no shortcuts here. Add dulce de leche and beat another 2 minutes. In a separate bowl, whisk eggs, cream, cornstarch, lemon juice, and espresso powder. Pour into cream cheese mixture and fold gently with a spatula until just combined.
Step 6: Assembly Magic
Pour filling into your cooled churro crust. Tap the pan firmly on the counter 10 times to release air bubbles. Smooth the top with an offset spatula.
Step 7: The Water Bath Technique
Wrap the outside of your springform pan with two layers of heavy-duty foil. Place in a roasting pan and pour hot water into the roasting pan until it reaches halfway up the springform sides. This prevents cracking and ensures creamy texture.
Step 8: Low and Slow Baking
Bake at 325°F for 40-45 minutes. The center should jiggle slightly like firm jello when gently shaken. Turn off oven, crack the door, and let cheesecake rest inside for 1 hour. This gradual cooling is essential.
Step 9: The Final Chill
Remove from water bath, unwrap foil, and refrigerate uncovered for 4 hours minimum (overnight is even better).
Part 3: The Dramatic Finish
Step 10: Crown Your Creation
Just before serving, brush the top with remaining melted butter and dust generously with cinnamon-cardamom sugar. For extra drama, create a chocolate ganache (equal parts heavy cream and dark chocolate, melted together) and drizzle in decorative patterns.
Pro Tips
Tip 1: The Temperature Rule: Room temperature ingredients aren’t optional—they’re essential. Cold eggs create dense filling, cold cream cheese creates lumps. Set everything out 2 hours before baking.
Tip 2: Cardamom’s Magic: This isn’t traditional, but cardamom adds an aromatic complexity that makes people wonder what makes your version taste so special. It’s my secret weapon.
Tip 3: The Espresso Trick: You won’t taste coffee, but espresso powder amplifies the dulce de leche’s caramel notes exponentially. This is a pastry chef technique.
Tip 4: Water Bath Wisdom: Some recipes skip this. Don’t. The gentle, moist heat creates that silky, crack-free top that separates amateur from professional results.
Tip 5: The Jiggle Test: When checking doneness, the center 3-inch circle should wobble like set custard. If the entire surface is firm, you’ve overbaked it.
Tip 6: Press your cream cheese with your finger. It should indent easily without resistance. If it’s firm or cold, it’s not ready.
Serving Suggestions
The Classic: Serve chilled with a tiny espresso cup on the side for dipping bites between sips.
The Elevated: Top each slice with a quenelle of cinnamon whipped cream and candied orange peel.
The Decadent: Warm dulce de leche sauce (thin it with cream) and pour tableside for dramatic effect.
The Playful: Serve with Mexican hot chocolate shooters and a lime wedge for squeezing over each bite.
The Brunch Winner: Cut into smaller squares and serve as part of a dessert board with fresh figs, marcona almonds, and aged manchego cheese.
Storage & Reheating
Store in an airtight container for 5 days refrigerated. The churro edges soften slightly after day 3, but flavor remains excellent.
For longer storage, freeze individual slices wrapped in plastic then foil for up to 6 weeks. Thaw overnight in the refrigerator and bring to cool room temperature before serving.
Don’t add the final butter and sugar coating until serving day—this keeps everything from getting soggy.
Health & Nutrition Info
Can be made dairy-free with full-fat coconut cream in place of cream cheese (not coconut milk—you need the thickness). The churro base works perfectly with plant butter.
Can be made gluten-free by replacing flour with a 1:1 gluten-free blend in the churro dough. Results are nearly identical.
For a lower sugar option, reduce the cinnamon-cardamom sugar coating by half. Don’t reduce sugar in the filling—it affects texture.
No dulce de leche? Make your own by simmering a can of sweetened condensed milk in water for 3 hours, or substitute with caramel sauce mixed with a pinch of salt.
Conclusion
The authentic churro texture, the unexpected cardamom warmth, the caramelized depth of dulce de leche… these elements create something genuinely special. This recipe respects both the churro’s Spanish street food heritage and cheesecake’s refined elegance.
Try it once. You’ll never go back to the crescent roll version.
Try this Twisted Churro Cheesecake and let me know how it turned out! Share your photos and tag me on social media. If you loved this recipe, check out my other elevated dessert recipes!
FAQ
Can I pipe the churro base ahead?
Yes! Pipe it, cover loosely with plastic, and refrigerate up to 24 hours before the first bake. Bring to room temperature before baking.
What if I don’t have a piping bag?
Use a gallon zip-top bag with the corner snipped off. It won’t create the ridged texture, but the flavor stays incredible.
Is the water bath really necessary?
For this recipe, yes. The churro crust needs protection from direct oven heat, and the filling requires gentle cooking.
Can I use a regular cake pan?
Springform pans are crucial here—you need to release the sides without damaging your churro walls. A regular pan won’t work.
Can I make mini versions?
Absolutely! Use a muffin tin, pipe churro dough to create cups, and reduce filling bake time to 18-22 minutes.
What if my churro base didn’t puff?
Your eggs were too cold, or you didn’t beat the mixture long enough. The dough needs to be smooth and glossy before piping.
What if my filling cracked?
Temperature shock. Make sure your water bath stays full and don’t skip the oven-resting phase.
What if the bottom is soggy?
The churro base wasn’t baked enough before adding filling. It should be crisp and dry to touch.
What if my filling tastes eggy?
You overmixed after adding eggs, or baked at too high temperature. Fold gently and trust the low temperature.
What if I can’t release from pan?
Run a thin knife dipped in hot water around the edges before unclasping the springform. Make sure it’s thoroughly chilled first.
Have You Tried Our Recipe?
There are no reviews yet. Be the first one to write one.