
The Best Chocolate Caramel Dump Cake
Welcome to my kitchen! Today, I’m sharing my chocolate caramel dump cake, a dessert that’s always a hit at family gatherings and potlucks. I first tried this recipe at my neighbor’s birthday party three years ago, and I literally went back for thirds (no shame!). The combination of rich chocolate, gooey caramel, and that signature dump cake texture made me an instant fan. I begged for the recipe on the spot, and it’s been my go-to easy chocolate caramel dessert ever since.
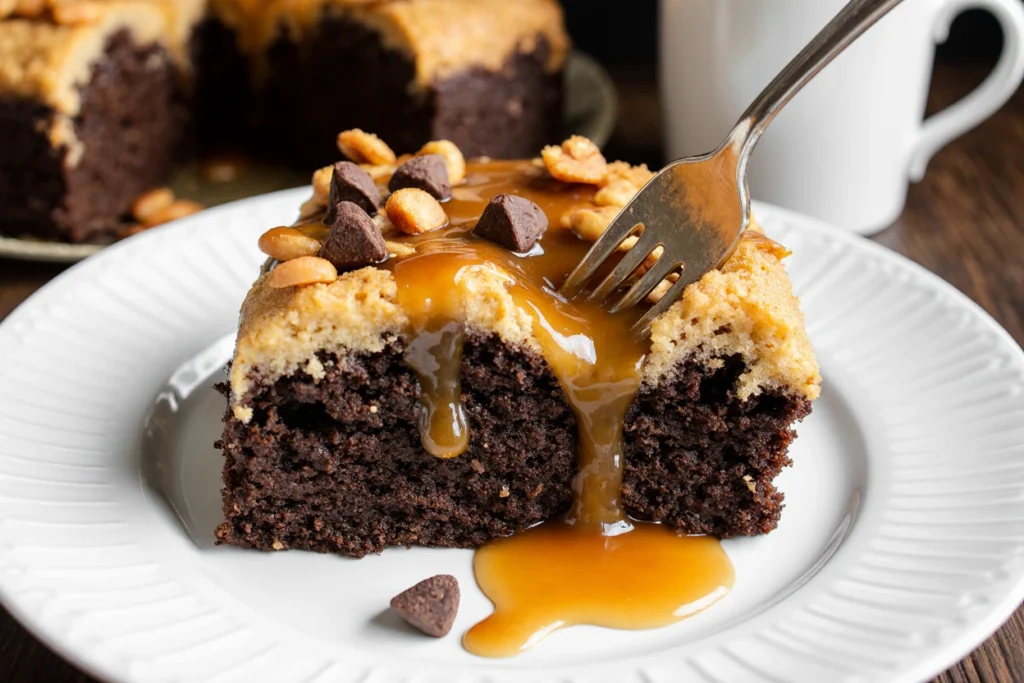
This recipe is perfect for anyone who loves a moist chocolate dump cake and wants something ridiculously easy to throw together. Seriously, if you can open a few boxes and pour melted butter, you can make this. There’s no mixing, no fancy techniques, and no stress. Just dump, bake, and devour. Whether you’re a baking newbie or just need a quick dessert that looks impressive, this gooey chocolate caramel dump cake delivers every single time.
What I love most is how forgiving this recipe is. Forgot to preheat the oven? No problem. Kids “helping” in the kitchen? Perfect recipe for them. Need dessert in under an hour? Done. Let’s dive in and see why this chocolate caramel dump cake is a must-try!
Table of Contents
Quick Recipe Facts
Prep Time: 10 minutes
Cook Time: 45 minutes
Total Time: 55 minutes
Servings: 12-15 servings
Difficulty: Beginner
Calories: ~320 per serving (with ice cream, it’s a splurge!)
Friendly touch: This recipe is surprisingly quick and easy – perfect for busy afternoons when you need dessert but don’t want to spend hours in the kitchen!
Ingredients
For this chocolate caramel dump cake, you’ll need the following ingredients. The beauty of dump cake with pudding is that everything comes together without any mixing bowls or electric mixers. You can find all of these at your regular grocery store, and I promise nothing here is fancy or hard to find.
For the Cake:
- 1 box (15.25 oz) chocolate cake mix (I use Devil’s Food for extra richness)
- 1 box (3.9 oz) instant chocolate pudding mix (the pudding makes it extra moist!)
- 1 jar (12 oz) caramel sauce or dulce de leche
- 1 can (14 oz) sweetened condensed milk
- 1 cup (2 sticks) unsalted butter, melted
- 1 cup semi-sweet chocolate chips
- ½ cup toffee bits or Heath bar pieces (optional, but highly recommended)
- ½ teaspoon sea salt flakes for topping (optional but amazing)
Pro tip: You can swap the chocolate chips for dark chocolate or white chocolate chips if you want to mix things up. Some people even use peanut butter chips for a different flavor profile. For a richer gooey chocolate caramel dump cake, use salted caramel sauce instead of regular caramel – it adds incredible depth.
Instructions
Step 1: Preheat your oven to 350°F (175°C) and grease a 9×13-inch baking dish with butter or non-stick spray. This helps your chocolate caramel dump cake release easily after baking, and trust me, you don’t want it sticking!
Step 2: Pour the sweetened condensed milk evenly across the bottom of your prepared pan. This creates a luscious, creamy base that soaks into the cake as it bakes.
Step 3: Drizzle the caramel sauce over the sweetened condensed milk. Don’t worry about making it perfect – those caramel swirls will create pockets of gooey goodness throughout your dessert.
Step 4: Sprinkle the dry chocolate cake mix evenly over the caramel layer. Here’s the key: don’t mix it! Just let it sit on top. I know it looks weird, but that’s what makes dump cakes so magical.
Step 5: Sprinkle the dry chocolate pudding mix over the cake mix layer. Again, no stirring required. The pudding mix helps create that signature moist chocolate dump cake texture we’re after.
Step 6: Scatter the chocolate chips evenly across the top, followed by the toffee bits if you’re using them.
Step 7: Pour the melted butter evenly over the entire surface, making sure to cover as much of the dry mix as possible. The butter will seep down and create a beautiful crust on top while keeping everything moist underneath. I like to use a spoon to drizzle it in a back-and-forth pattern.
Step 8: Bake for 40-45 minutes, until the top is golden brown and you can see the edges bubbling. The center might look slightly jiggly – that’s perfect! It will set as it cools.
Step 9: Remove from the oven and immediately sprinkle with sea salt flakes if desired. Let it cool for at least 15-20 minutes before serving. I know it’s hard to wait, but this cooling time helps the layers set properly.

Pro Tips
Tip 1: Use room temperature sweetened condensed milk for easier pouring and more even distribution across your pan.
Tip 2: For an extra gooey chocolate caramel dump cake, add an extra ½ cup of caramel sauce. You really can’t have too much caramel in this recipe!
Tip 3: Don’t skip the sea salt on top – it balances the sweetness and makes the chocolate and caramel flavors pop. It’s that sweet-and-salty combo that keeps people coming back for more.
Tip 4: Make sure your butter is fully melted but not scorching hot. If it’s too hot, it can cause the cake mix to clump. I usually melt mine in the microwave in 30-second intervals.
Tip 5: If you want a crunchier top, add an extra ½ cup of chocolate chips or chopped pecans during the last 10 minutes of baking.
Tip 6: Use a light-colored metal pan if possible. Dark pans can cause the bottom to brown too quickly.
Serving Suggestions
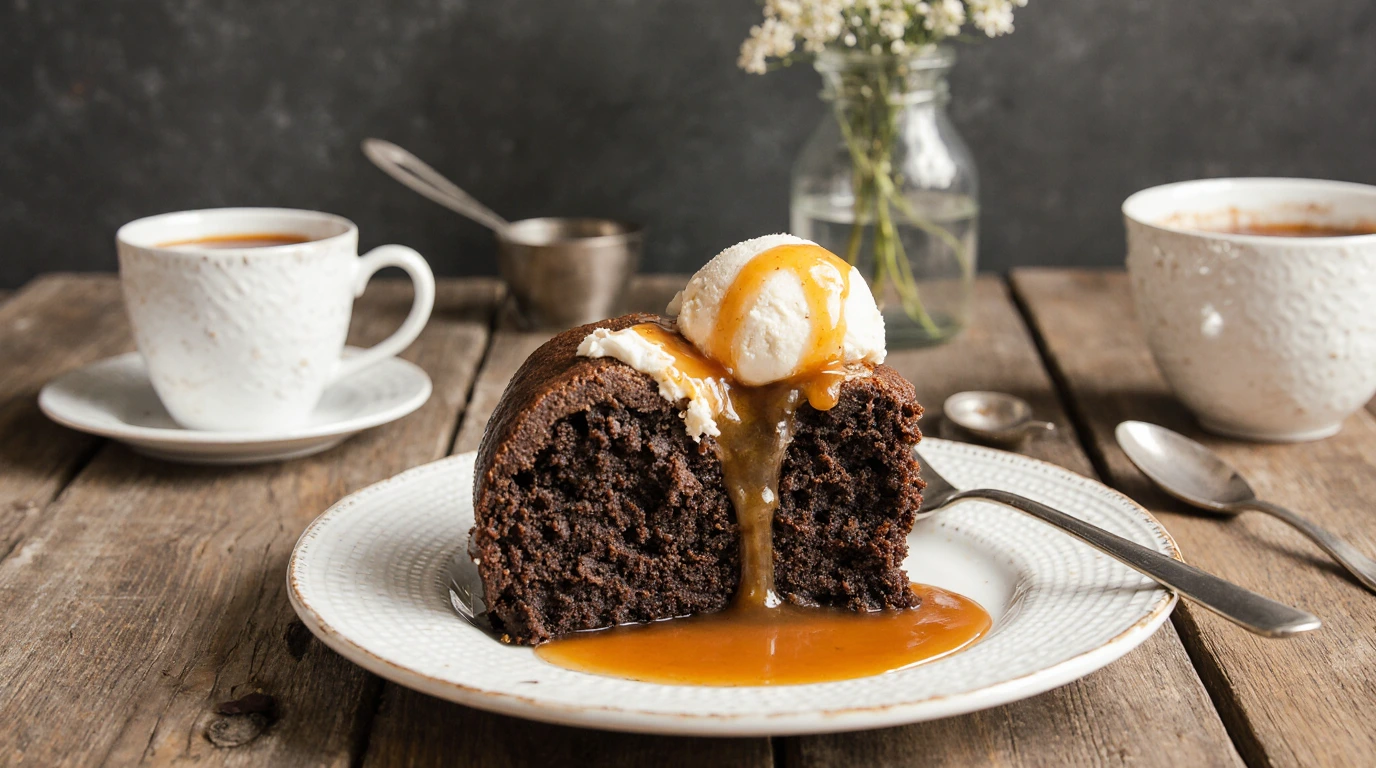
This easy chocolate caramel dessert is best served warm or at room temperature, when the caramel is still soft and gooey. I love serving it straight from the pan with a big scoop of vanilla ice cream melting on top – the contrast of hot and cold is incredible.
Other serving ideas:
- Pair with a strong cup of coffee for an afternoon treat
- Add a dollop of whipped cream and a drizzle of extra caramel sauce
- Serve alongside fresh berries to cut through the richness
- Top with crushed pretzels for extra crunch and that sweet-salty vibe
These serving ideas elevate your dump cake with pudding experience and make it feel like a restaurant-quality dessert, even though it took you barely any effort!
Storage & Reheating
Store your leftover chocolate caramel dump cake in an airtight container at room temperature for 2-3 days. The cake stays surprisingly moist when stored properly, and some people (including me) think it tastes even better the next day once all the flavors have melded together.
To reheat, warm individual portions in the microwave for 15-20 seconds, or reheat the whole pan in a 300°F oven for about 10 minutes. Avoid refrigerating if possible – it can make the texture a bit dense. If you do refrigerate it, just bring it back to room temperature or warm it up before serving.
Health & Nutrition Info
Let’s be real – this is a decadent dessert, not a health food! Each serving contains approximately 320-350 calories, depending on how generous your portions are. But you can make some lighter swaps if you want:
Healthier modifications:
- Use sugar-free pudding mix and sugar-free caramel sauce to reduce sugar content
- Swap half the butter for unsweetened applesauce (though it won’t be quite as rich)
- Use dark chocolate chips (70% cacao) for antioxidants and less sugar
- Serve smaller portions with lots of fresh fruit on the side
This moist chocolate dump cake is perfect for special occasions and weekend treats. I don’t make it every week, but when I do, I fully enjoy it without guilt!
Conclusion
There you have it – the easiest, most delicious chocolate caramel dump cake you’ll ever make! This recipe has saved me countless times when I needed a crowd-pleasing dessert without the stress. The best part? Everyone always thinks you spent hours on it, when really, you just dumped and baked.
Try this gooey chocolate caramel dump cake at your next gathering and watch it disappear. I’d love to hear how it turned out for you! Drop a comment below, rate the recipe, and share your photos on social media. Tag me so I can see your creations!
Looking for more easy dump cake recipes? Check out my Pineapple Coconut Dump Cake and Cherry Almond Dump Cake – they’re just as simple and delicious!
FAQ
Can I freeze this chocolate caramel dump cake?
Yes! Your chocolate caramel dump cake can be frozen for up to 2 months. Let it cool completely, then wrap tightly in plastic wrap and aluminum foil. Thaw overnight in the refrigerator and reheat before serving. The texture might be slightly different, but it’s still delicious.
What if I don’t have instant pudding mix?
You can skip the pudding mix, but your cake won’t be quite as moist. If you leave it out, add an extra ¼ cup of sweetened condensed milk to compensate. The pudding really does make a difference in creating that signature gooey texture!
Can I make this dump cake with pudding ahead of time?
Absolutely! You can assemble the entire cake (except for the butter) up to 4 hours before baking. Keep it covered in the fridge, then add the melted butter and bake when you’re ready. This is perfect for holiday meal prep.
How can I adjust the sweetness?
This is definitely a sweet dessert. To tone it down, use dark chocolate cake mix instead of Devil’s Food, reduce the sweetened condensed milk to ¾ cup, and use unsweetened chocolate chips. The sea salt on top also helps balance the sweetness.
Can I make this in a slow cooker?
Yes! Layer everything the same way in a greased slow cooker, cook on low for 3-4 hours, and keep the lid slightly vented to prevent too much moisture buildup. It won’t have the same crispy top, but it’ll be incredibly gooey!
What’s the difference between dump cake and regular cake?
Dump cakes don’t require mixing – you literally dump the ingredients in layers and let the magic happen in the oven. The butter melts down through the dry cake mix, creating a unique texture that’s part cake, part cobbler. It’s much easier and more forgiving than traditional cakes.
Have You Tried Our Recipe?
There are no reviews yet. Be the first one to write one.