
The Ultimate Chocolate Fudge Cake Recipe
Welcome to my kitchen! Today, I’m sharing my chocolate fudge cake recipe, a dessert that’s always a hit at family gatherings and special celebrations. I first tried making this cake for my daughter’s birthday three years ago, and let me tell you, it was love at first bite. The room went silent as everyone devoured their slices, and I knew I had struck gold. This recipe is perfect for anyone who loves an easy chocolate fudge cake and wants something delicious, rich, and surprisingly simple to bake.
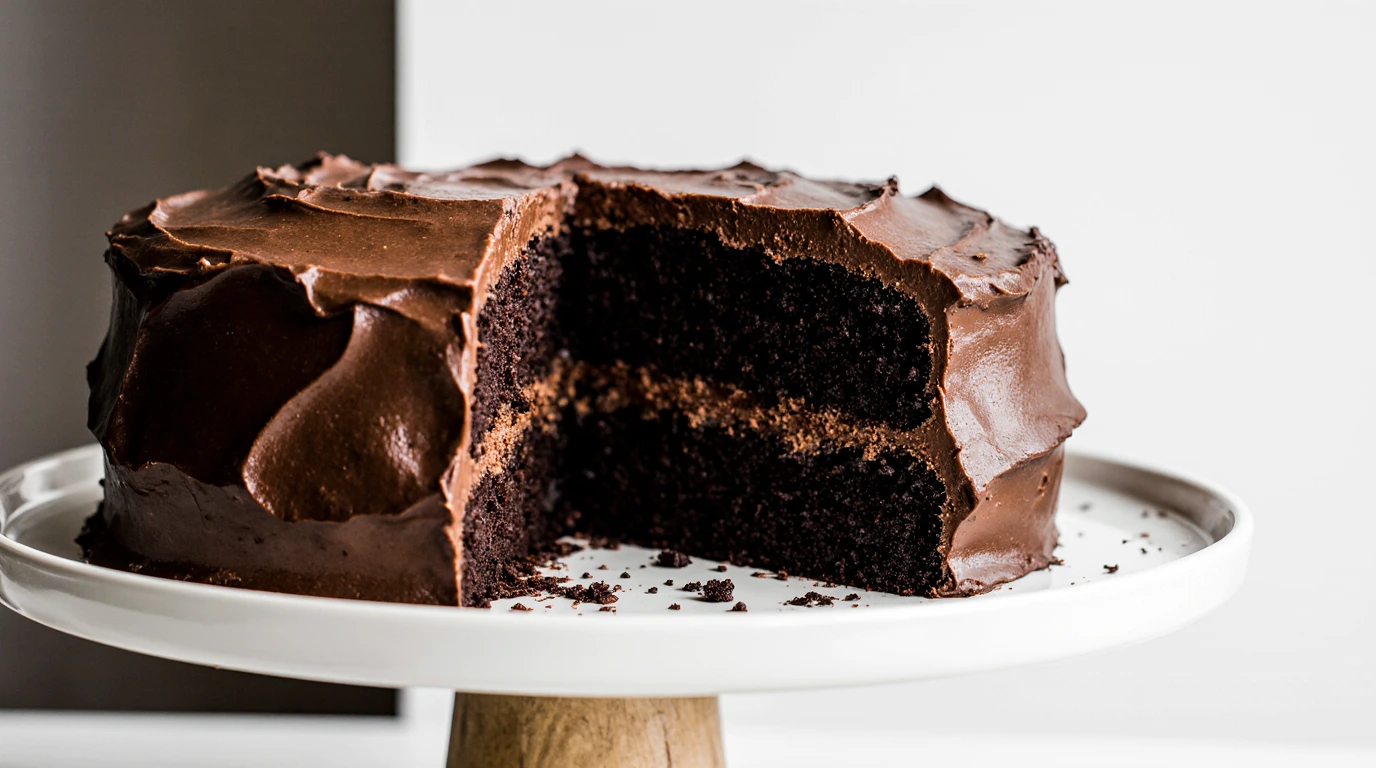
What makes this homemade chocolate fudge cake so special? It’s the perfect balance of deep chocolate flavor and incredibly moist texture. Unlike some cakes that turn out dry or crumbly, this one stays tender for days. I’ve made it countless times since that first birthday party, tweaking and perfecting it until it became my go-to recipe. Whether you’re celebrating a milestone or just craving something sweet on a Tuesday afternoon, this cake delivers every single time.
The best part? You don’t need any fancy equipment or hard-to-find ingredients. This chocolate fudge cake from scratch comes together with pantry staples and straightforward steps. Even if you’re new to baking, you’ll feel like a pro when this beauty comes out of the oven. The rich, fudgy layers are complemented by a silky chocolate frosting that takes the whole experience over the top. Trust me, once you make this moist chocolate fudge cake, it’ll become your signature dessert too. Let’s dive in and see why this recipe is an absolute must-try!
Table of Contents
Quick Recipe Facts
Prep Time: 20 minutes
Cook Time: 35 minutes
Total Time: 55 minutes
Servings: 12 slices
Difficulty: Easy
Calories: ~380 per slice
This recipe is surprisingly quick and easy – perfect for busy afternoons when you want something impressive without spending hours in the kitchen!
Ingredients
For this chocolate fudge cake, you’ll need the following ingredients. I’ve organized everything into two sections to keep things simple. The cake itself uses basic pantry staples, while the frosting adds that signature fudgy richness. You can swap butter with coconut oil for a slightly different flavor profile, though I prefer the classic butter version. Brown sugar adds depth and helps create that incredible moist texture everyone raves about.
For the Cake:
- 2 cups all-purpose flour
- 2 cups granulated sugar
- ¾ cup unsweetened cocoa powder
- 2 teaspoons baking powder
- 1½ teaspoons baking soda
- 1 teaspoon salt
- 2 large eggs (room temperature works best)
- 1 cup whole milk
- ½ cup vegetable oil
- 2 teaspoons vanilla extract
- 1 cup boiling water
For the Chocolate Fudge Frosting:
- 1 cup unsalted butter, softened
- 3½ cups powdered sugar
- ¾ cup unsweetened cocoa powder
- ½ cup heavy cream
- 2 teaspoons vanilla extract
- Pinch of salt
Pro tip: Using room temperature eggs and milk helps everything blend smoothly for this simple chocolate fudge cake. Cold ingredients can cause the batter to seize up, affecting texture.
Instructions
Making this best chocolate fudge cake recipe is easier than you might think. Just follow these straightforward steps, and you’ll have a show-stopping dessert in under an hour.
Step 1: Preheat your oven to 350°F (175°C). Grease two 9-inch round cake pans with butter or cooking spray, then line the bottoms with parchment paper. This double protection ensures your cake releases perfectly every time. I learned this the hard way after my first attempt stuck to the pan!
Step 2: In a large mixing bowl, whisk together the flour, sugar, cocoa powder, baking powder, baking soda, and salt. Make sure there are no lumps in the cocoa powder. This dry mixture is the foundation of your rich chocolate fudge cake, so take a moment to combine everything evenly.
Step 3: Add the eggs, milk, oil, and vanilla extract to the dry ingredients. Using an electric mixer on medium speed, beat for about 2 minutes until well combined. The batter will be thick at this point, but don’t worry – that’s exactly what we want.
Step 4: Carefully stir in the boiling water. The batter will become quite thin and runny, which might seem alarming, but this is the secret to getting that incredibly moist texture. This is what transforms a regular chocolate cake into an exceptional chocolate fudge layer cake. Mix just until combined.
Step 5: Divide the batter evenly between your prepared pans. I like to use a kitchen scale to ensure both layers are the same size, but eyeballing it works fine too.
Step 6: Bake for 30-35 minutes, or until a toothpick inserted into the center comes out with just a few moist crumbs. Don’t overbake! This old fashioned chocolate fudge cake should be moist and tender, not dry.
Step 7: Let the cakes cool in the pans for 10 minutes, then turn them out onto wire racks to cool completely. This step is crucial – frosting a warm cake will result in a melted mess.
Step 8: While the cakes cool, make your frosting. Beat the softened butter until creamy and pale, about 2 minutes. Add the powdered sugar and cocoa powder gradually, alternating with splashes of heavy cream. Beat in the vanilla and salt. The frosting should be smooth, spreadable, and incredibly rich.
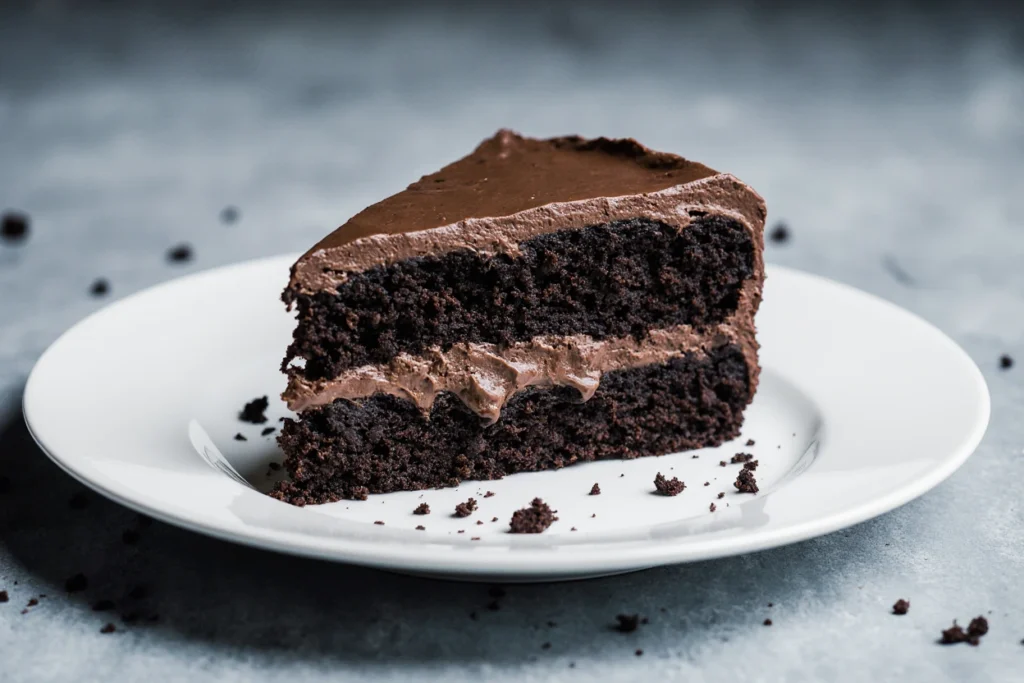
Step 9: Once the cakes are completely cool, place one layer on your serving plate. Spread about one-third of the frosting on top. Add the second layer and use the remaining frosting to cover the top and sides. I use an offset spatula for the smoothest finish, but a regular butter knife works great too.
Step 10: Let the frosted cake sit for at least 30 minutes before slicing. This allows the frosting to set slightly, making cleaner cuts. Now you know how to make chocolate fudge cake that looks as good as it tastes!
Pro Tips
Tip 1: Don’t skip the parchment paper step. It’s the difference between a cake that slides out effortlessly and one you have to chisel out in pieces. Trust me on this one.
Tip 2: Room temperature ingredients are key for this chocolate fudge cake with frosting. Cold eggs and milk won’t incorporate as smoothly, leading to a denser texture. Just set them out 30 minutes before you start baking.
Tip 3: For an even more intense chocolate flavor, add 2 teaspoons of instant espresso powder to your dry ingredients. It won’t make the cake taste like coffee – it just amplifies the chocolate beautifully.
Tip 4: Grease your pans thoroughly, even the sides. Then dust them lightly with cocoa powder instead of flour for a professional touch that won’t leave white marks on your dark cake.
Tip 5: If your frosting seems too thick, add cream one tablespoon at a time. Too thin? Add more powdered sugar. You want a consistency that spreads easily but holds its shape.
Tip 6: Use Dutch-process cocoa for the deepest, darkest color and most complex chocolate flavor. Regular cocoa works fine, but Dutch-process takes this chocolate fudge birthday cake to another level.
Tip 7: Let your cakes cool completely – and I mean completely. Even slightly warm layers will cause your frosting to slide right off. Patience pays off here.
Serving Suggestions
This cake is stunning served as is, but here are some ways to make it even more special. Serve slices at room temperature with a tall glass of cold milk or a hot cup of coffee. The contrast between the rich cake and a simple beverage is perfection.
For extra indulgence, add a scoop of vanilla ice cream on the side. As it melts into the warm cake, you get these incredible pools of creamy vanilla that complement the chocolate beautifully. Fresh raspberries or strawberries add a bright, tart note that cuts through the richness.
Hosting a party? Decorate the top with chocolate shavings, fresh berries, or even edible flowers for an Instagram-worthy presentation. A light dusting of powdered sugar creates an elegant finish for more formal occasions. These serving ideas elevate your homemade chocolate fudge cake from delicious to absolutely memorable.
For kids’ birthdays, top with colorful sprinkles before the frosting sets. For adults, a drizzle of salted caramel or a sprinkle of flaky sea salt adds sophisticated complexity. However you serve it, this cake disappears fast!
Storage & Reheating
Store your chocolate fudge cake in an airtight container or cake dome at room temperature for up to 3 days. The frosting acts as a seal, keeping the layers moist and tender. I actually think it tastes even better on day two after the flavors have melded together.
If you need to keep it longer, refrigerate it for up to 5 days. Just bring it back to room temperature before serving – cold cake doesn’t have the same luxurious texture. Cover it loosely with plastic wrap, making sure the wrap doesn’t touch the frosting.
For longer storage, wrap individual slices in plastic wrap, then aluminum foil, and freeze for up to 3 months. Thaw overnight in the refrigerator, then bring to room temperature. While I don’t typically recommend reheating this cake since it’s meant to be enjoyed at room temperature, a quick 10-second zap in the microwave can refresh a refrigerated slice. Leftover chocolate fudge cake stays moist when stored properly, maintaining that perfect fudgy texture we all love.
Avoid storing this cake in the fridge uncovered – it will dry out and absorb other food odors. The container is your best friend here!
Health & Nutrition Info
Let’s be honest – this is an indulgent dessert, and that’s perfectly okay! Each slice contains approximately 380 calories, making it a special-occasion treat rather than an everyday snack. The cake does provide some iron from the cocoa and a bit of protein from the eggs and milk.
Want to lighten it up? You can replace half the oil with unsweetened applesauce to reduce fat content without sacrificing too much moisture. Greek yogurt works as a substitute for some of the butter in the frosting, creating a tangier but still delicious version. For a dairy-free adaptation, use almond or oat milk in the cake and coconut cream in the frosting.
Gluten-free friends can swap the all-purpose flour for a 1:1 gluten-free baking blend. The texture will be slightly different but still delicious. You can also reduce the sugar by about ¼ cup if you prefer a less sweet cake, though I’d keep the frosting as written since it’s already balanced.
This recipe can be adapted for various dietary needs without losing its essential character. Just remember that any substitutions may slightly affect texture and flavor. Consider swaps for lower sugar or healthier fats based on your needs, but don’t feel guilty about enjoying the original version for special moments. Life is short – eat the cake!
Conclusion
There you have it – my tried-and-true chocolate fudge cake recipe that never fails to impress. This cake has been the star of countless birthdays, dinner parties, and “just because” afternoons in my house. The combination of deep chocolate flavor, moist crumb, and rich frosting creates something truly special that brings people together.
What I love most about this recipe is its versatility. You can dress it up for elegant occasions or keep it simple for casual gatherings. It’s forgiving enough for beginners yet impressive enough to satisfy experienced bakers. Whether you’re making it for the first time or the fiftieth, this cake delivers consistent, crowd-pleasing results.
I’d love to hear how your cake turns out! Did you add any personal touches? Serve it with something unexpected? Leave a comment below with your experience, and don’t forget to rate this recipe. If you share photos on social media, tag me so I can see your beautiful creation. Your feedback helps me create even better recipes for you.
Looking for more chocolate desserts? Check out my recipes for triple chocolate brownies, chocolate chip cookies, and molten lava cakes. They’re all equally delicious and worth trying. Happy baking, and enjoy every fudgy, chocolatey bite!
FAQ
Can I freeze this chocolate fudge cake?
Yes! Your chocolate fudge cake can be frozen for up to 2 months. Wrap cooled, unfrosted layers individually in plastic wrap and aluminum foil. Thaw in the refrigerator overnight, then bring to room temperature and frost. You can also freeze the fully frosted cake, though the frosting texture may change slightly upon thawing.
What if I don’t have vegetable oil?
No problem! You can substitute melted coconut oil, melted butter, or even melted ghee. Each will add a slightly different flavor note, but all work beautifully. I’ve used melted butter before and loved the richer taste it provided.
Can I make this cake ahead of time?
Absolutely! Bake the layers up to 2 days in advance, wrap them tightly in plastic wrap, and store at room temperature. Frost the cake the day you plan to serve it for the best presentation. The unfrosted layers actually become even more moist as they sit.
How can I adjust the sweetness?
The cake itself isn’t overly sweet, but the frosting is quite rich. If you prefer less sweetness, reduce the powdered sugar in the frosting by ½ cup. You can also use dark cocoa powder for a more bittersweet chocolate flavor that balances the sugar.
Can I make this as cupcakes instead?
Yes! This batter makes about 24 cupcakes. Fill liners two-thirds full and bake at 350°F for 18-22 minutes. They’re perfect for easy chocolate fudge cake in portable form, ideal for parties and lunchboxes.
Why is my cake dense instead of fluffy?
The most common cause is overmixing the batter after adding the liquid ingredients, or using expired leavening agents. Make sure your baking powder and baking soda are fresh, and mix just until combined once you add the boiling water.
Can I use this recipe for a sheet cake?
Definitely! Pour all the batter into a greased 9×13-inch pan and bake for 35-40 minutes. You’ll get a slightly denser but equally delicious single-layer cake that’s perfect for casual gatherings and potlucks.
Have You Tried Our Recipe?
There are no reviews yet. Be the first one to write one.