

The Ultimate Healthy Chocolate Snack: Dark Chocolate Energy Bites
Welcome to my kitchen! Today, I’m sharing my healthy chocolate snack, a treat that’s always a crowd-pleaser and guilt-free. I first discovered the magic of these chocolate energy bites during a particularly hectic work week when I desperately needed something sweet but didn’t want to derail my health goals. After raiding my pantry for wholesome ingredients, I whipped up my first batch, and they instantly became a staple in my household.
My kids request them for after-school snacks, my husband grabs them pre-workout, and I love having them with my afternoon coffee. This recipe is perfect for anyone who loves a low sugar chocolate snack and wants something easy, nutritious, and satisfying to make. What makes these bites truly special is that they taste indulgent while being packed with protein, fiber, and healthy fats.
Whether you’re looking for a nutritious chocolate treat for your kids’ lunchboxes or need a quick energy boost during your busy day, these no-bake chocolate bites deliver on all fronts. They come together in just 15 minutes with simple pantry staples, and you can customize them endlessly to suit your taste preferences. Let’s dive in and see why this healthy chocolate snack is a must-try that will revolutionize your snacking routine!
Table of Contents
Quick Recipe Facts
Prep Time: 15 minutes
Chill Time: 30 minutes
Total Time: 45 minutes
Servings: 20 bites
Difficulty: Easy (No baking required!)
Calories: ~95 per bite
Friendly touch: This recipe is surprisingly quick and easy – perfect for busy afternoons when you need a wholesome treat without turning on the oven!
Ingredients
For this healthy chocolate snack, you’ll need the following simple ingredients. The beauty of this recipe is its flexibility – you can swap almond butter with peanut butter or sunflower seed butter for a nut-free organic chocolate snack version. I love using raw honey instead of maple syrup when I want a richer depth of sweetness, though both work beautifully. The dark cocoa powder is what gives these bites their intense chocolate flavor without the added sugar you’d find in traditional chocolate treats.
Base Ingredients:
- 1 cup old-fashioned rolled oats (use gluten-free if needed)
- ½ cup natural almond butter (or nut butter of choice)
- ⅓ cup raw honey or pure maple syrup
- ¼ cup unsweetened dark cocoa powder
- 2 tablespoons ground flaxseed
- 1 teaspoon pure vanilla extract
- Pinch of sea salt
Mix-ins (Optional but Delicious):
- ⅓ cup mini dark chocolate chips (70% cacao or higher)
- 2 tablespoons chia seeds
- 2 tablespoons unsweetened shredded coconut
- 2 tablespoons hemp hearts for extra protein
Coating (Optional):
- Extra cocoa powder for dusting
- Crushed nuts or coconut flakes
Ingredient Notes: When choosing your cocoa powder, opt for unsweetened Dutch-processed cocoa for a smoother, less bitter taste. For the oats, I recommend using certified gluten-free oats if you’re serving anyone with gluten sensitivities. The flaxseed not only adds omega-3s but also helps bind everything together, making your guilt-free chocolate snack hold its shape perfectly.
Instructions
Step 1: Prepare Your Workspace
Start by lining a baking sheet or large plate with parchment paper – this is where your finished healthy chocolate snack bites will chill. Having everything ready before you begin makes the process smooth and enjoyable. I also like to have a small bowl of water nearby to dampen my hands slightly when rolling the mixture into balls, which prevents sticking.
Step 2: Combine Wet Ingredients
In a large mixing bowl, combine the almond butter, honey (or maple syrup), and vanilla extract. Stir vigorously with a wooden spoon until completely smooth and well-incorporated. The mixture should look glossy and creamy. If your almond butter is quite thick or cold from the refrigerator, you can microwave it for about 15 seconds to make mixing easier. This step creates the binding base for your low sugar chocolate snack.
Step 3: Add Dry Ingredients
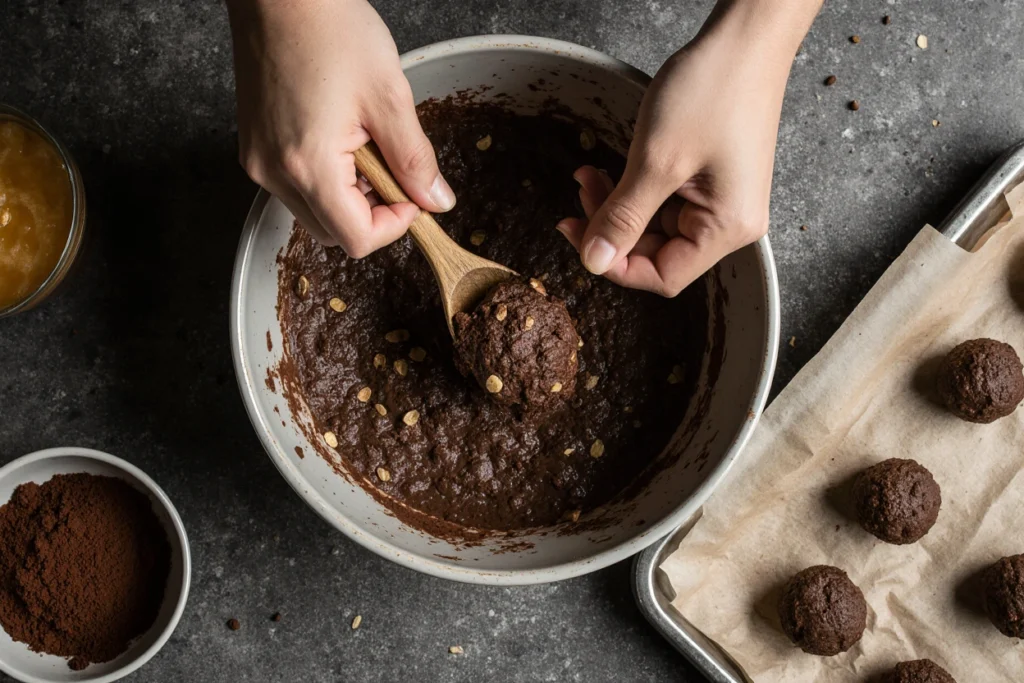
Add the rolled oats, cocoa powder, ground flaxseed, and sea salt to your wet mixture. Using that same wooden spoon (I swear by wooden spoons for this – they just work better!), stir everything together until no dry pockets remain. The mixture should be thick, slightly sticky, but not overly wet. If it seems too dry, add a teaspoon of water or almond milk. If it’s too wet, add another tablespoon of oats. Don’t be afraid to use your hands at this stage – sometimes they’re the best tool for getting everything evenly mixed.
Step 4: Fold in Mix-ins
Now comes the fun part! Gently fold in your chosen mix-ins – dark chocolate chips, chia seeds, coconut, or hemp hearts. This is where you can really personalize your nutritious chocolate treats. My kids love extra chocolate chips, while I prefer adding coconut for texture. Stir just until evenly distributed throughout the mixture.
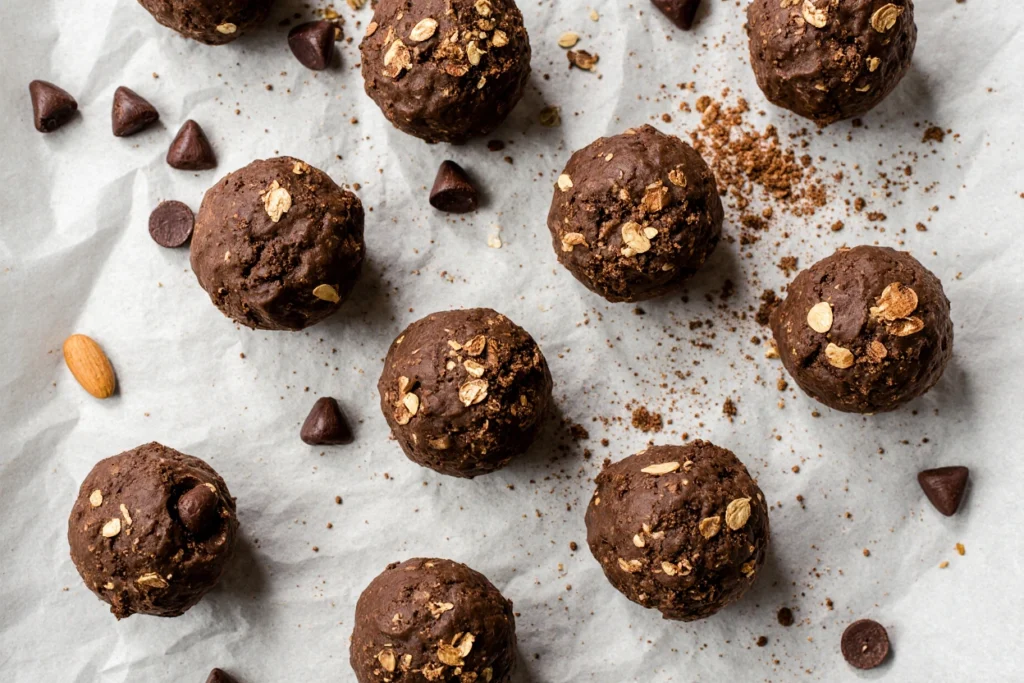
Step 5: Roll into Bites
Using about one tablespoon of mixture at a time, roll the dough between your palms to form smooth, compact balls. Place each ball on your prepared baking sheet, spacing them slightly apart. You should get about 20 bites from this recipe. If the mixture isn’t holding together well, refrigerate it for 10 minutes before rolling – this makes it much easier to work with. For a fancier presentation, you can roll the finished balls in extra cocoa powder or crushed nuts.
Step 6: Chill and Set
Transfer your baking sheet to the refrigerator and chill for at least 30 minutes. This helps the bites firm up and makes them easier to handle. While you’re waiting, resist the temptation to sample them (or don’t – I won’t judge!). The chilling process allows the flavors to meld together beautifully, creating the perfect organic chocolate snack texture.
Step 7: Store and Enjoy
Once chilled, transfer your chocolate bites to an airtight container. They’re now ready to enjoy whenever you need a quick energy boost or satisfy a chocolate craving the healthy way!
Pro Tips
Tip 1: Don’t skip the flaxseed – it acts as a natural binder and adds wonderful nutritional benefits. Ground flaxseed works much better than whole seeds for this recipe because it integrates seamlessly into the mixture.
Tip 2: Use natural nut butter with just one ingredient (nuts!). Nut butters with added oils or sugar can change the texture and sweetness level of your healthy chocolate snack, making it harder to achieve the perfect consistency.
Tip 3: Taste your mixture before rolling! Since these are no-bake, you can safely taste the dough and adjust sweetness or chocolate intensity to your preference. Add an extra tablespoon of honey if you like things sweeter, or another teaspoon of cocoa for more chocolate punch.
Tip 4: Make them uniform in size by using a cookie scoop or tablespoon measure. This ensures even portions and makes your guilt-free chocolate snack look professionally made. Plus, it helps with calorie tracking if that’s important to you.
Tip 5: Experiment with different flavor profiles! Try adding a pinch of espresso powder to intensify the chocolate flavor, or a dash of cinnamon for warmth. Peppermint extract creates a wonderful mint-chocolate variation that’s perfect for holidays.
Tip 6: If you’re making these for kids, let them help roll the balls – it’s a fantastic kitchen activity that teaches measurements and following recipes. My children love getting their hands messy with this one!
Serving Suggestions
These nutritious chocolate treats are incredibly versatile when it comes to serving. Here are my favorite ways to enjoy them:
- Morning Energy: Grab 2-3 bites with your morning coffee or tea for a satisfying breakfast accompaniment that provides sustained energy without a sugar crash
- Pre/Post-Workout: The combination of complex carbs from oats and protein from nut butter makes these perfect fuel before or after exercise
- Afternoon Pick-Me-Up: Beat the 3 p.m. slump with one or two bites and a glass of cold milk or your favorite plant-based alternative
- Dessert Substitute: Serve as a healthier dessert option alongside fresh berries and a small square of dark chocolate
- Kids’ Lunchboxes: Pack 1-2 bites in lunch containers for a treat that parents and kids both feel good about
- Party Platter: Arrange on a decorative plate with fresh fruit, nuts, and cheese for an impressive appetizer spread
The beauty of this low sugar chocolate snack is that it satisfies sweet cravings while providing real nutrition, making it appropriate for any time of day.
Storage & Reheating
Proper storage keeps your healthy chocolate snack fresh and delicious for days:
Refrigerator Storage: Store in an airtight container in the refrigerator for up to 2 weeks. The cool temperature keeps them firm and perfect for grabbing on the go. I like using glass containers with tight-fitting lids to maintain freshness.
Freezer Storage: These bites freeze beautifully! Place them in a freezer-safe container or bag, separating layers with parchment paper to prevent sticking. They’ll keep for up to 3 months. Let them thaw for 5-10 minutes at room temperature before eating, or enjoy them frozen for a firmer, fudge-like texture – especially refreshing on hot summer days.
Room Temperature: If you prefer a softer texture, leftover healthy chocolate snack bites can sit at room temperature for a few hours, though I don’t recommend storing them this way long-term in warm climates as the nut butter can become too soft.
Make-Ahead Tip: These are perfect for meal prep! Make a double batch on Sunday and portion them into grab-and-go containers for the entire week. They actually taste better after a day or two as the flavors develop and meld together.
Health & Nutrition Info
One of the best things about this nutritious chocolate treat is that it genuinely nourishes your body while satisfying chocolate cravings. Here’s what makes these bites so special:
Nutritional Benefits:
- Protein-Packed: Each bite contains approximately 3-4 grams of protein from almond butter and optional hemp hearts, helping keep you full and satisfied
- Fiber-Rich: Oats and flaxseed provide about 2 grams of fiber per bite, supporting digestive health and steady blood sugar levels
- Healthy Fats: The almonds and optional chia seeds deliver omega-3 fatty acids that support heart and brain health
- Antioxidants: Dark cocoa powder is loaded with flavonoids and antioxidants that may support cardiovascular health
- Low Glycemic: Natural sweeteners and complex carbs prevent blood sugar spikes, making this a smart low sugar chocolate snack option
Approximate Nutrition Per Bite:
- Calories: 95
- Total Fat: 5g
- Carbohydrates: 11g
- Fiber: 2g
- Protein: 3g
- Sugar: 4g (naturally occurring)
Dietary Modifications:
- Gluten-Free: Use certified gluten-free oats
- Vegan: This recipe is already vegan when using maple syrup instead of honey
- Nut-Free: Substitute sunflower seed butter or tahini for almond butter
- Lower Sugar: Reduce honey/maple syrup to ¼ cup and add a few drops of stevia
- Keto-Friendly: Replace oats with almond flour and use a sugar-free sweetener (though this changes the texture)
This healthier organic chocolate snack option is perfect for anyone seeking treats that align with their wellness goals without sacrificing flavor or satisfaction.
Conclusion
Try this healthy chocolate snack and transform the way you think about satisfying your sweet tooth! These chocolate energy bites prove that healthy eating doesn’t mean deprivation – it means making smart, delicious choices that fuel your body and delight your taste buds. The best part? They take just minutes to prepare, require no special equipment or baking skills, and use ingredients you probably already have in your pantry. Whether you’re a busy parent looking for nutritious options for your family, a fitness enthusiast seeking clean fuel, or simply someone who loves chocolate and wants to enjoy it guilt-free, these bites are your new best friend.
I’d love to hear how your healthy chocolate snack turned out! Leave a comment below telling me about your favorite mix-ins or creative variations. Did you add espresso powder? Try a different nut butter? Share your experience and photos on social media using #HealthyChocolateBites so we can all get inspired. Don’t forget to rate this recipe and check out my other nutritious treats like Date-Sweetened Brownies, No-Bake Peanut Butter Cups, and Banana Oat Cookies. Happy snacking, friends!
FAQ
Q: Can I freeze this recipe?
A: Absolutely! Yes, your healthy chocolate snack can be frozen for up to 3 months. Place the bites in a freezer-safe container with parchment paper between layers to prevent sticking. They thaw quickly at room temperature (about 10 minutes) or you can enjoy them straight from the freezer for a firmer, truffle-like texture. I actually prefer them semi-frozen during summer months!
Q: What if I don’t have almond butter?
A: No problem at all! You can substitute with any nut or seed butter you have on hand. Peanut butter, cashew butter, and sunflower seed butter all work beautifully. Just make sure to use natural versions without added oils or sugars, as these can affect the texture. If using a particularly runny nut butter, you might need to add an extra tablespoon of oats to compensate.
Q: Can I make these ahead of time?
A: These are actually perfect for making ahead! In fact, I always recommend it. Prepare a batch on Sunday for the entire week. They keep beautifully in the refrigerator for up to 2 weeks, making them ideal for meal prep. The flavors also develop and improve after sitting for a day, so advance preparation actually enhances your low sugar chocolate snack.
Q: How can I adjust the sweetness?
A: The sweetness is easily customizable! Start with the suggested ⅓ cup of honey or maple syrup, then taste the mixture before rolling (it’s safe since there are no eggs). Want it sweeter? Add another tablespoon of sweetener. Prefer less sweet? Reduce to ¼ cup. You can also add a pinch of stevia or monk fruit sweetener for sweetness without additional calories. Remember, the dark chocolate chips also add sweetness if you include them.
Q: Why are my bites falling apart?
A: If your mixture seems too dry and won’t hold together, it’s usually because your nut butter wasn’t creamy enough or your oats absorbed more moisture. Simply add liquid one teaspoon at a time (water, almond milk, or melted coconut oil) until the mixture holds together when squeezed. Alternatively, refrigerate the mixture for 10-15 minutes before rolling – this helps everything bind together better.
Q: Can I use quick oats instead of rolled oats?
A: While rolled oats work best for texture, you can use quick oats in a pinch. Your nutritious chocolate treats will have a slightly smoother, less chewy texture, but they’ll still taste delicious. I don’t recommend steel-cut oats as they’re too coarse and won’t integrate well into the mixture.
Q: Are these safe for people with nut allergies?
A: Yes, with modifications! Replace the almond butter with sunflower seed butter or tahini to make them nut-free. Just ensure all your other ingredients (like chocolate chips) are processed in nut-free facilities if the allergy is severe. These substitutions create an equally delicious guilt-free chocolate snack that everyone can enjoy safely.
Q: How do I know when they’re properly chilled?
A: After 30 minutes in the refrigerator, your chocolate bites should feel firm to the touch and hold their shape easily when lifted. If they still seem soft or sticky, give them another 15-20 minutes. The exact time can vary based on your refrigerator temperature and how tightly you packed the mixture when rolling.
Have You Tried Our Recipe?
There are no reviews yet. Be the first one to write one.