
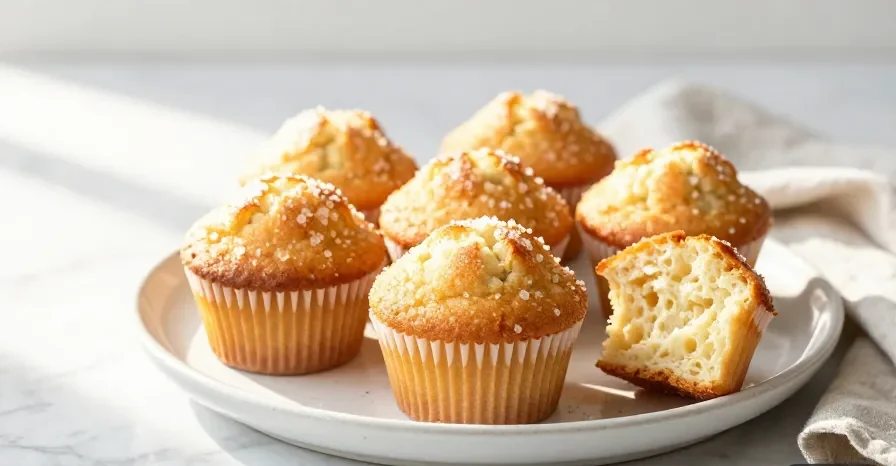
Easy Classic Vanilla Muffins – The Best Homemade Recipe!
There’s something magical about the smell of freshly baked vanilla muffins wafting through the kitchen on a lazy Sunday morning. I still remember the first time I made these easy classic vanilla muffins – I was hosting brunch for friends and needed something simple yet impressive. These muffins were an instant hit! Golden tops, tender crumb, and that perfect vanilla flavor that makes everyone reach for seconds. What I love most about this recipe is how foolproof it is. Whether you’re a seasoned baker or just starting out, these vanilla muffins from scratch come together in one bowl with basic pantry ingredients. No fancy equipment, no complicated techniques – just pure, homemade goodness. They’re perfect for breakfast, snack time, or even dessert.
My kids request these moist vanilla muffins at least twice a week, and I never mind making them because they’re so quick and easy. The best part? You can customize them endlessly – add chocolate chips, fresh berries, or a simple glaze. Today, I’m walking you through every step so you can create bakery-quality homemade vanilla muffins right in your own kitchen. Trust me, once you try this simple vanilla muffin recipe, you’ll never buy store-bought again!
Table of Contents
Quick Recipe Facts
Prep Time: 10 minutes
Cook Time: 18 minutes
Total Time: 28 minutes
Servings: 12 muffins
Difficulty: Easy
Calories: ~210 per muffin
This recipe is surprisingly quick and easy – perfect for busy mornings when you want something homemade without the hassle!
Ingredients
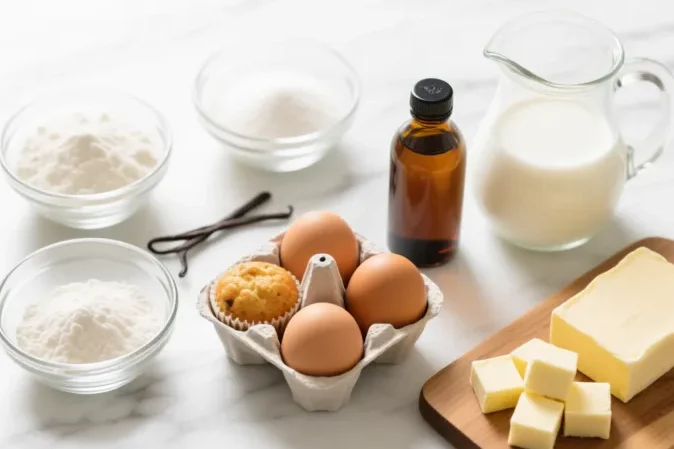
For these easy classic vanilla muffins, you’ll need the following ingredients. The beauty of this recipe is that everything is likely already in your pantry! You can swap butter with melted coconut oil for a lighter texture, or use Greek yogurt instead of sour cream for extra protein. I prefer using pure vanilla extract rather than imitation – it really does make a difference in creating that rich, authentic vanilla flavor that makes your muffins irresistible.
Dry Ingredients:
- 2 cups all-purpose flour
- ¾ cup granulated sugar
- 2½ teaspoons baking powder
- ½ teaspoon salt
Wet Ingredients:
- 2 large eggs (room temperature)
- ½ cup unsalted butter, melted and slightly cooled
- 1 cup whole milk (room temperature)
- ⅓ cup sour cream or plain Greek yogurt
- 2 teaspoons pure vanilla extract
Optional Topping:
- 2 tablespoons coarse sugar for sprinkling
Instructions
Step 1: Preheat your oven to 375°F (190°C) and line a 12-cup muffin tin with paper liners or grease generously with butter. This temperature helps your easy classic vanilla muffins develop those beautiful golden dome tops.
Step 2: In a large mixing bowl, whisk together the flour, sugar, baking powder, and salt. Make sure there are no lumps – this ensures your muffins have an even, tender crumb throughout.
Step 3: In a separate medium bowl, whisk the eggs until lightly beaten. Add the melted butter, milk, sour cream, and vanilla extract. Whisk until everything is smooth and well combined. The mixture should look creamy and uniform.
Step 4: Pour the wet ingredients into the dry ingredients all at once. Using a rubber spatula or wooden spoon, gently fold everything together until just combined. Here’s the secret to moist vanilla muffins: don’t overmix! It’s okay if you see a few small lumps. Overmixing develops the gluten and makes muffins tough and dense. Mix until you can’t see dry flour anymore, then stop.
Step 5: Let the batter rest for 5 minutes while your oven finishes preheating. This allows the flour to hydrate and the baking powder to activate, resulting in fluffier muffins.
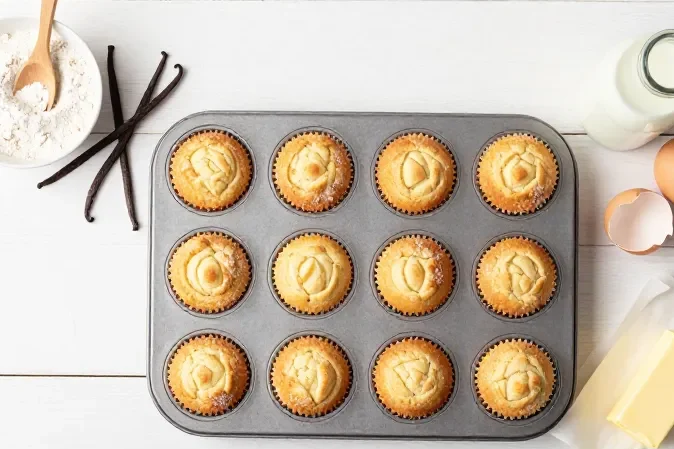
Step 6: Divide the batter evenly among the 12 muffin cups, filling each about ¾ full. I like using an ice cream scoop for perfectly portioned muffins. Sprinkle the tops with coarse sugar if desired – this creates a delightful sweet, crunchy crust.
Step 7: Bake for 18-20 minutes, or until the muffin tops are golden brown and spring back when lightly touched. A toothpick inserted into the center should come out clean or with just a few moist crumbs. Don’t overbake, or your muffins will be dry.
Step 8: Remove from the oven and let the muffins cool in the pan for 5 minutes, then transfer to a wire rack. Enjoy warm or at room temperature!
Pro Tips
Tip 1: Room temperature ingredients are key! Cold eggs and milk don’t mix well with melted butter and can create a lumpy batter. Set your eggs and milk out 30 minutes before baking.
Tip 2: Don’t skip the sour cream or Greek yogurt – this is what makes these homemade vanilla muffins incredibly moist and tender. The acidity also helps activate the baking powder for better rise.
Tip 3: For extra fluffy muffins, fold in an additional tablespoon of flour right at the end. This seems counterintuitive, but it helps create those gorgeous bakery-style domed tops.
Tip 4: Use an oven thermometer to ensure accurate temperature. Most ovens run hot or cold, and baking at the wrong temperature can result in flat or burnt muffins.
Tip 5: If you want to make these ahead, prepare the dry ingredients the night before and store in an airtight container. In the morning, just mix the wet ingredients and combine – fresh muffins in under 30 minutes!
Tip 6: Grease your muffin liners with a light spray of cooking oil before adding batter. This helps the muffins release easily and prevents sticking – trust me, it makes a difference!
Serving Suggestions
These easy classic vanilla muffins are delicious served warm with a pat of butter melting on top. They pair beautifully with your morning coffee or afternoon tea. For a special breakfast treat, serve alongside fresh fruit salad and scrambled eggs. Kids love them in lunchboxes, and they’re perfect for brunch gatherings.
Want to dress them up? Add a dollop of whipped cream and fresh berries. During summer, I love pairing these muffins with sliced strawberries and a drizzle of honey. For dessert, warm them slightly and serve with a scoop of vanilla ice cream. You can also split them in half and make mini strawberry shortcakes.
These serving ideas elevate your simple vanilla muffin recipe from basic breakfast to something truly special. They’re versatile enough for any occasion!
Storage & Reheating
Store your easy classic vanilla muffins in an airtight container at room temperature for up to 3 days. They’ll stay soft and moist if properly sealed – I use a large plastic container with a tight-fitting lid. Avoid refrigerating them, as this actually dries them out faster due to starch retrogradation.
For longer storage, these muffins freeze beautifully! Wrap each muffin individually in plastic wrap, then place them all in a freezer-safe bag. They’ll keep for up to 3 months. To thaw, leave them at room temperature for about an hour, or microwave for 20-30 seconds.
To reheat, pop a muffin in the microwave for 10-15 seconds to bring back that fresh-from-the-oven warmth. You can also warm them in a 300°F oven for 5-7 minutes. Leftover moist vanilla muffins stay delicious when stored properly – though they rarely last long in my house!
Health & Nutrition Info
Each of these homemade vanilla muffins contains approximately 210 calories, 8g fat, 30g carbohydrates, and 4g protein. While these aren’t a health food, they’re made with real, wholesome ingredients you can feel good about serving your family.
Want to lighten them up? You can substitute half the butter with unsweetened applesauce, use low-fat milk and Greek yogurt, or reduce the sugar to ½ cup. For a dairy-free version, use almond or oat milk and coconut oil. Gluten-free? Swap in a 1:1 gluten-free flour blend.
You can also boost the nutrition by adding ¼ cup ground flaxseed or wheat germ to the dry ingredients, or folding in fresh blueberries for extra antioxidants. This healthier vanilla muffins from scratch option is perfect for weekend treats without the guilt. The beauty of homemade is that you control exactly what goes in!
Conclusion
There you have it – the easiest, most delicious vanilla muffins you’ll ever make! These easy classic vanilla muffins have become a staple in my home, and I know they’ll quickly become a favorite in yours too. Whether you’re baking for a weekend brunch, prepping breakfast for the week, or just craving something sweet and comforting, this recipe delivers every single time.
What I love most is how versatile these muffins are. Once you master the basic recipe, you can customize them endlessly with your favorite mix-ins and toppings. The simple technique and foolproof results make them perfect for beginner bakers, while experienced bakers will appreciate the consistent, professional quality.
I’d love to hear how your muffins turn out! Did you add any special ingredients? Do you prefer them with or without the sugar topping? Leave a comment below and let me know. If you loved this recipe, please give it a 5-star rating and share it with your friends on Pinterest or Facebook. Your support helps me keep creating more delicious, easy recipes for you!
Looking for more breakfast inspiration? Check out my Blueberry Streusel Muffins, Cinnamon Coffee Cake, or Lemon Poppy Seed Bread. Happy baking!
FAQ
Can I freeze this recipe?
Absolutely! Yes, your easy classic vanilla muffins can be frozen for up to 3 months. Wrap each muffin individually in plastic wrap, then store them all together in a freezer-safe bag. They thaw beautifully and taste just as fresh as the day you baked them. This is my favorite trick for meal prep – bake a double batch and have quick breakfasts ready anytime!
What if I don’t have sour cream?
No problem! You can substitute equal amounts of plain Greek yogurt, regular plain yogurt, or even buttermilk. In a pinch, mix 1 tablespoon of lemon juice or white vinegar into ⅓ cup milk and let it sit for 5 minutes to create a sour milk substitute. The acidity is what keeps these moist vanilla muffins tender, so any of these swaps will work great.
Can I make these ahead of time?
Yes! You can prepare the dry ingredients up to 1 week ahead and store in an airtight container. The wet ingredients can be mixed the night before and refrigerated. In the morning, just bring the wet ingredients to room temperature, combine everything, and bake. Baked muffins stay fresh for 3 days at room temperature or can be frozen for later.
How can I adjust the sweetness?
If you prefer less sweet muffins, reduce the sugar to ½ cup. For sweeter muffins, increase to 1 cup. Keep in mind that sugar also affects texture and moisture, so dramatic changes might alter the final result. I find ¾ cup is the perfect balance – sweet enough to satisfy without being cake-like.
Why did my muffins turn out dry?
The most common cause is overbaking or overmixing the batter. Check your muffins at 16 minutes – ovens vary, and even 2-3 extra minutes can dry them out. Also make sure you’re measuring flour correctly (spoon and level, don’t scoop). Overmixing develops gluten and creates tough, dry muffins, so fold gently until just combined.
Can I use oil instead of butter?
Absolutely! You can replace the melted butter with an equal amount of neutral oil like vegetable, canola, or melted coconut oil. Oil-based muffins tend to stay moist even longer than butter-based ones. This also makes the recipe dairy-free if you use non-dairy milk.
What mix-ins work well?
These vanilla muffins from scratch are a perfect base for add-ins! Try ¾ cup chocolate chips, fresh or frozen blueberries, diced strawberries, chopped nuts, or cinnamon chips. You can also swirl in ¼ cup of jam or Nutella. Fold add-ins in gently at the very end to avoid overmixing.
How do I get those pretty domed tops?
Start with a higher oven temperature (375°F), fill the cups generously (¾ full), and don’t open the oven door during the first 12 minutes of baking. Room temperature ingredients and proper mixing technique also help create that beautiful bakery-style dome. The coarse sugar on top adds to that professional look!
Have You Tried Our Recipe?
There are no reviews yet. Be the first one to write one.