
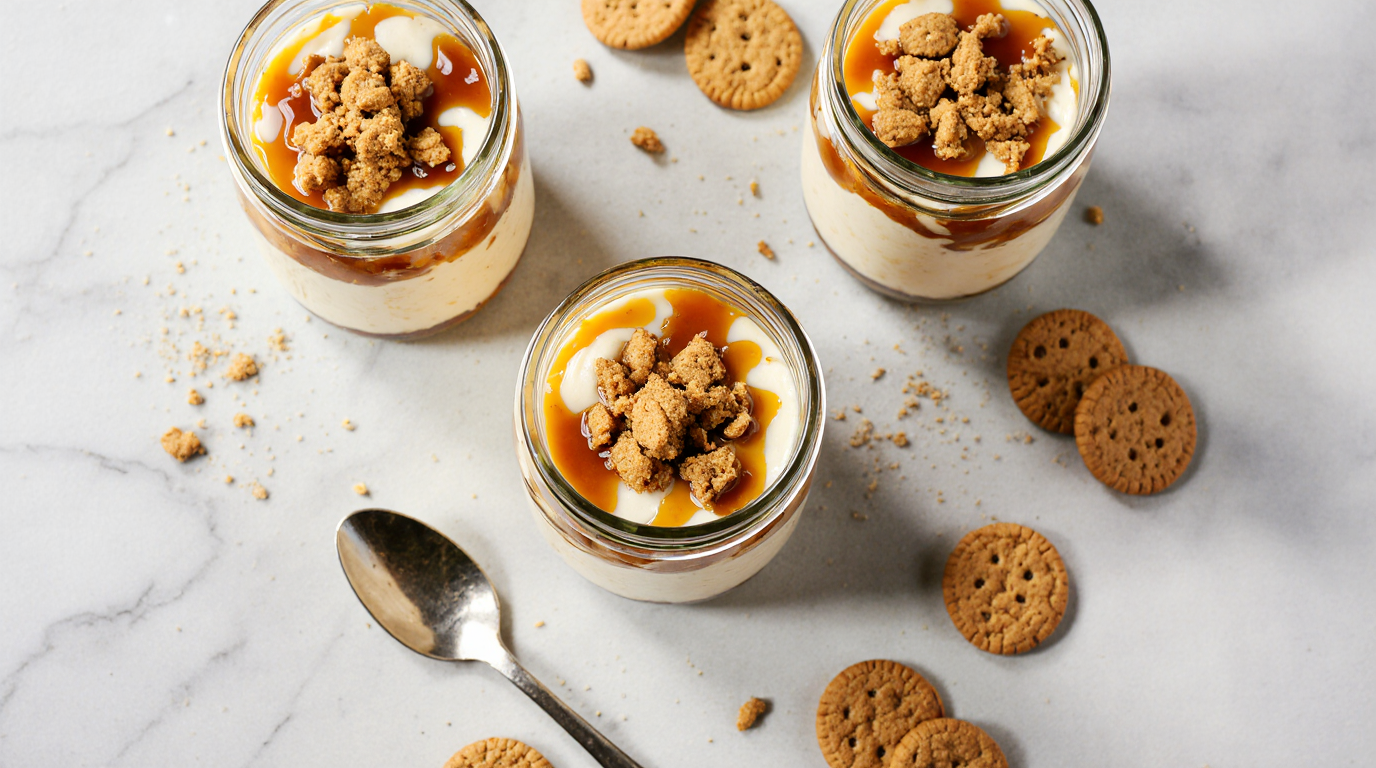
No Bake Biscoff Cheesecake Cups – Easy Individual Desserts Everyone Will Love!
Welcome to my kitchen! Today, I’m sharing my no bake biscoff cheesecake cups, a dessert that’s always a hit at gatherings and family dinners. I first tried these adorable little treats at a friend’s brunch last spring, and I couldn’t stop thinking about them. The combination of creamy cheesecake filling and those irresistible Biscoff cookies was just too good to forget! After a few kitchen experiments, I perfected this recipe, and it instantly became my go-to when I need something impressive but surprisingly simple.
This recipe is perfect for anyone who loves mini biscoff cheesecake cups and wants something easy, delicious, and fun to make without turning on the oven. Whether you’re hosting a dinner party, bringing dessert to a potluck, or just treating yourself on a weeknight, these individual cheesecake cups deliver bakery-quality results with minimal effort. The best part? No baking required, which means you can whip these up even on the hottest summer days.
What makes this easy no bake biscoff cheesecake so special is the beautiful layering of crushed Biscoff cookie crust, velvety cream cheese filling infused with cookie butter, and a gorgeous topping that looks like it came from a fancy dessert shop. Each spoonful gives you that perfect balance of crunchy, creamy, and sweet. Plus, making them in individual cups means easy portion control and adorable presentation. Let’s dive in and see why this biscoff cheesecake in a cup is a must-try!
Table of Contents
Quick Recipe Facts
Prep Time: 20 minutes
Chill Time: 4 hours (or overnight)
Total Time: 4 hours 20 minutes
Servings: 8 cups
Difficulty: Easy
Calories: ~320 per serving
Friendly touch: This recipe is surprisingly quick and easy – perfect for busy afternoons when you want to impress without the stress! Prep your ingredients for a smooth biscoff cheesecake recipe no bake experience, and you’ll have these beauties chilling in the fridge in no time.
Ingredients
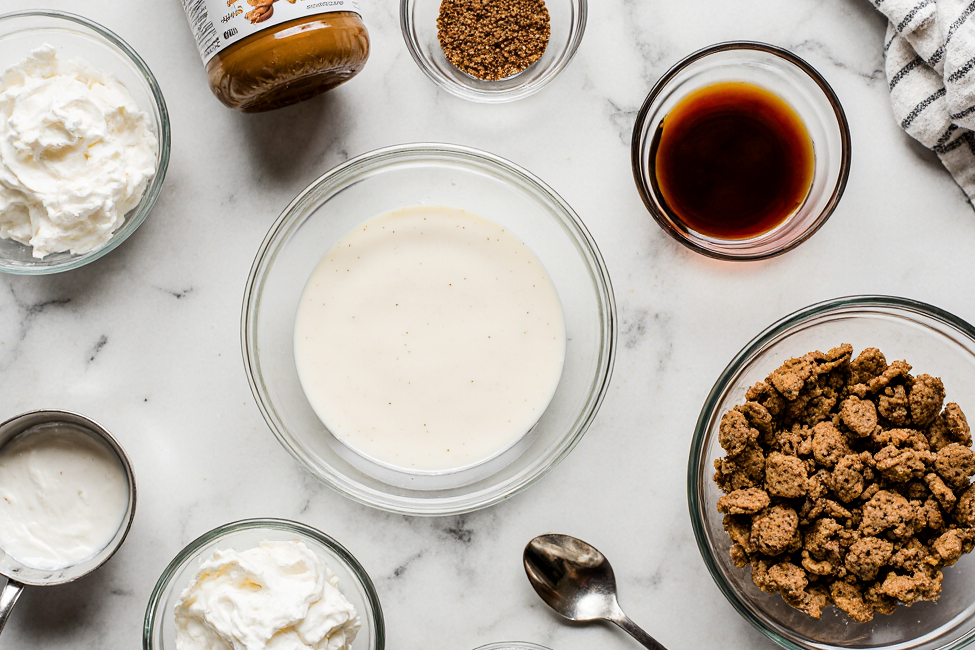
For this no bake biscoff cheesecake cups recipe, you’ll need the following ingredients. I love how simple the ingredient list is – most of these items are probably already in your pantry! You can swap regular cream cheese with a lighter version if you prefer, though I find full-fat gives you that luxuriously creamy texture. The Biscoff cookie butter is the star here, adding that signature caramelized, spiced flavor that makes these cups so addictive.
For the Biscoff Crust:
- 15 Biscoff cookies (about 1½ cups crushed)
- 3 tablespoons unsalted butter, melted
- 1 tablespoon granulated sugar
For the Cheesecake Filling:
- 16 oz cream cheese, softened to room temperature
- ½ cup Biscoff cookie butter (smooth or crunchy)
- ⅔ cup powdered sugar
- 1 teaspoon vanilla extract
- 1 cup heavy whipping cream, cold
- Pinch of salt
For the Topping:
- ¼ cup Biscoff cookie butter, melted
- 4 Biscoff cookies, crushed for garnish
- Whipped cream (optional)
Pro tip: Brown sugar adds a rich, caramel flavor if you want to swap the granulated sugar in the crust. For a lighter version of this mini biscoff cheesecake cups recipe, you can use light cream cheese, though the texture will be slightly less rich.
Instructions
Step 1: Prepare Your Cups
Line up 8 small dessert cups, mason jars, or clear plastic cups on your counter. Clear containers work beautifully because you can see those gorgeous layers! This makes your biscoff cheesecake in a cup look extra impressive.
Step 2: Make the Biscoff Crust
Crush the Biscoff cookies in a food processor until they’re fine crumbs, or place them in a sealed bag and crush with a rolling pin (great stress relief, by the way!). Mix the cookie crumbs with melted butter and sugar in a bowl until everything is well combined and resembles wet sand.
Divide the mixture evenly among your 8 cups, using about 2-3 tablespoons per cup. Press down firmly with the back of a spoon or a small glass to create a compact layer. Pop these in the fridge while you make the filling – this helps the crust set nicely.
Step 3: Whip the Cream
In a large mixing bowl, beat the cold heavy cream with an electric mixer on high speed until stiff peaks form. This usually takes 3-4 minutes. Don’t skip this step or underbeat it – properly whipped cream is what gives your easy no bake biscoff cheesecake that light, mousse-like texture. Set this aside for now.
Step 4: Make the Cheesecake Filling
In a separate large bowl, beat the softened cream cheese until it’s smooth and fluffy, about 2 minutes. Make sure your cream cheese is truly at room temperature – this prevents lumps! Add the Biscoff cookie butter, powdered sugar, vanilla extract, and a pinch of salt. Beat on medium speed until everything is completely smooth and well combined, scraping down the sides of the bowl as needed.
Here’s where the magic happens: gently fold the whipped cream into the cream cheese mixture using a rubber spatula. Use a folding motion rather than stirring to keep all that air you whipped into the cream. Fold slowly and gently until no white streaks remain and the mixture is light and creamy.
Step 5: Assemble the Cups
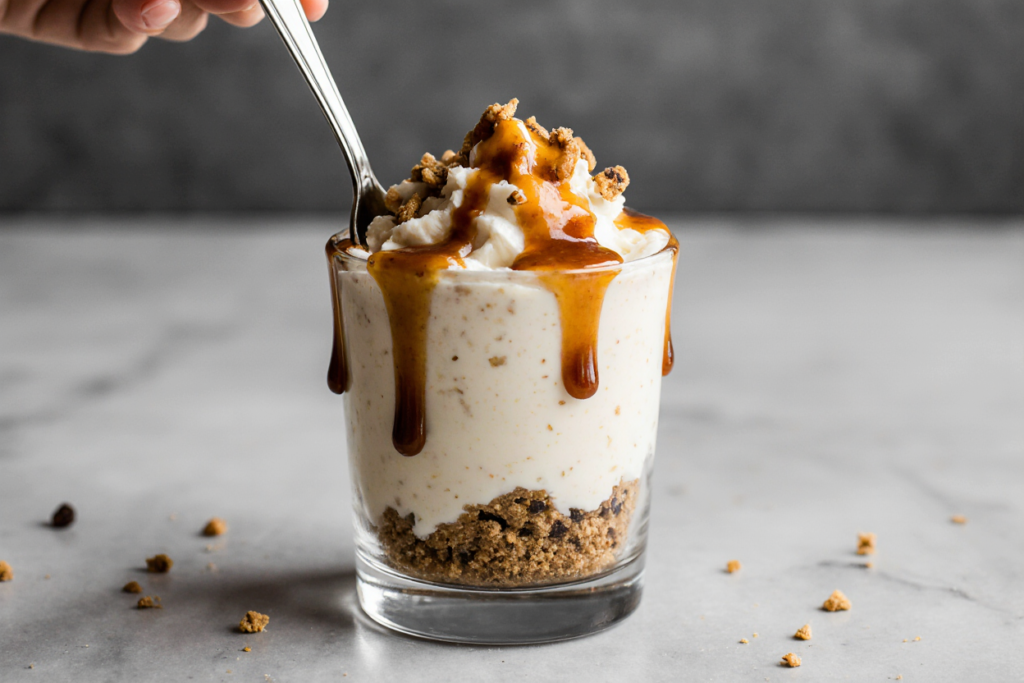
Remove your cups with the crusts from the fridge. Spoon or pipe the cheesecake filling on top of each crust, dividing it evenly among the 8 cups. I like using a piping bag for a cleaner look, but a spoon works perfectly fine too. Smooth the tops with the back of a spoon.
Step 6: Add the Topping
Melt the ¼ cup of Biscoff cookie butter in the microwave for about 20-30 seconds, stirring until smooth and pourable. Drizzle this over the top of each cheesecake cup – you can create swirls or just drizzle it randomly for a rustic look. Sprinkle crushed Biscoff cookies on top for that final touch of texture and flavor.
Step 7: Chill
Cover your no bake biscoff cheesecake cups with plastic wrap or lids and refrigerate for at least 4 hours, or preferably overnight. This chilling time is crucial – it allows the filling to set properly and the flavors to meld together beautifully. Trust me, patience pays off here!
Pro Tips
Tip 1: Don’t skip softening the cream cheese completely. Cold cream cheese will give you lumps no matter how long you beat it. I usually leave mine on the counter for about an hour before starting.
Tip 2: For the smoothest filling, beat the cream cheese alone first before adding the Biscoff spread. This ensures a silky texture in your biscoff cheesecake recipe no bake.
Tip 3: If you want to make these ahead, they store beautifully in the fridge for up to 3 days. In fact, they taste even better the next day when all the flavors have had time to develop!
Tip 4: Want to make them extra fancy? Add a layer of caramel sauce between the crust and filling, or top with fresh berries for a pop of color and freshness.
Tip 5: Use a food processor to crush the cookies evenly. If doing it by hand, make sure the pieces are uniform so the crust holds together well.
Tip 6: For perfectly even layers, use a kitchen scale to portion out the crust and filling. It makes your mini biscoff cheesecake cups look professionally made!
Serving Suggestions
These biscoff cheesecake in a cup treats are absolutely divine served chilled straight from the fridge. The contrast between the cold, creamy filling and the crunchy crust is just perfect.
For an extra indulgent experience, add a dollop of freshly whipped cream on top just before serving, or even a small scoop of vanilla ice cream if you’re feeling adventurous. The cups pair beautifully with hot coffee or espresso – the slight bitterness of the coffee balances the sweetness perfectly.
If you’re serving these at a party, set them out on a pretty tray with small spoons. They’re grab-and-go friendly, which makes them ideal for buffet-style gatherings. You can also garnish with a whole Biscoff cookie stuck into the top for extra visual appeal.
For a seasonal twist, try adding a sprinkle of cinnamon or a drizzle of salted caramel sauce. Fresh strawberries or raspberries also complement the Biscoff flavor wonderfully if you want to add a fruity element.
Storage & Reheating
Store your no bake biscoff cheesecake cups in the refrigerator, covered with plastic wrap or lids, for up to 3 days. The filling stays wonderfully creamy, and the crust maintains its texture when kept cold.
These desserts actually benefit from being made ahead – the flavors deepen and the texture becomes even more luxurious after a day or two in the fridge. Just make sure they’re well-covered so they don’t absorb any refrigerator odors.
I don’t recommend freezing these cups because the texture of the no-bake cheesecake filling can become grainy when thawed. However, if you must freeze them, do so before adding the cookie butter drizzle topping. Wrap each cup tightly in plastic wrap, then place in a freezer bag. Thaw overnight in the fridge before serving and add the drizzle fresh.
For best results, always serve these chilled. Unlike baked cheesecakes, these should not be brought to room temperature – they’re meant to be enjoyed cold for that perfect creamy consistency.
Health & Nutrition Info
Each serving of this easy no bake biscoff cheesecake contains approximately 320 calories, though this can vary based on the specific brands you use and the size of your portions. These are definitely an indulgent treat, but you can make some modifications if you’re looking for a lighter option.
For a lower-calorie version, you can use light cream cheese (though the texture won’t be quite as rich) and reduce the amount of cookie butter slightly. You could also use a sugar substitute in place of powdered sugar, though I haven’t tested this personally.
Unfortunately, this recipe isn’t naturally gluten-free due to the Biscoff cookies, but you could experiment with gluten-free cookie alternatives for the crust. Just make sure to use a cookie with a similar texture and flavor profile.
These cups do contain dairy, but I’ve heard from readers who’ve had success using dairy-free cream cheese and coconut cream in place of heavy cream for a dairy-free version. The Biscoff cookies and cookie butter are actually vegan, which is a nice bonus if you’re making dairy-free substitutions.
As with any dessert, enjoy in moderation as part of a balanced diet. The good news is that since these are portioned individually, it’s easy to enjoy just one without going overboard!
Conclusion
I hope you love this no bake biscoff cheesecake cups recipe as much as my family and I do! These individual desserts are perfect for any occasion – from casual weeknight treats to impressive dinner party finales. The combination of that crunchy Biscoff crust, silky cheesecake filling, and sweet cookie butter drizzle is simply irresistible.
The beauty of this recipe is its simplicity. No oven required, no water baths to worry about, no risk of cracks or sunken centers. Just mix, layer, chill, and enjoy! Plus, making them in individual portions means everyone gets their own perfectly portioned dessert.
Try this biscoff cheesecake recipe no bake and let me know how it turned out!
FAQ
Can I freeze these no bake biscoff cheesecake cups?
While you technically can freeze them, I don’t recommend it because the texture of the filling can become slightly grainy when thawed. If you must freeze them, do so before adding the cookie butter drizzle, wrap each cup tightly, and thaw in the fridge overnight before serving.
What if I don’t have Biscoff cookies?
You can substitute graham crackers or vanilla wafer cookies for the crust, though you’ll lose that signature Biscoff flavor. For the cookie butter in the filling, there’s really no perfect substitute, but you could try using smooth peanut butter or almond butter with a bit of cinnamon added, though the flavor will be quite different.
Can I make these ahead of time?
Absolutely! These mini biscoff cheesecake cups are actually better when made ahead. They need at least 4 hours to set, but making them the day before serving is ideal. They’ll keep in the fridge for up to 3 days.
How can I adjust the sweetness?
If you find these too sweet, you can reduce the powdered sugar in the filling to ½ cup instead of ⅔ cup. You can also use less cookie butter, though this will reduce that signature Biscoff flavor. Taste your filling before assembling and adjust to your preference.
Can I make this in one large dish instead of individual cups?
Yes! You can assemble this in an 8-inch or 9-inch square dish or pie pan. Just press the crust into the bottom, spread the filling on top, and add your toppings. Chill the same way, then cut into squares or slices to serve.
What size cups should I use?
I use 8-ounce cups or jars for this recipe. You could also use smaller 4-ounce cups for more servings (you’d get about 12-14 smaller portions). Just adjust the amount of crust and filling per cup accordingly.
Can I use crunchy cookie butter instead of smooth?
Definitely! Crunchy Biscoff spread adds extra texture to the filling, which some people really love. It’s completely up to your personal preference.
Do I need to use full-fat cream cheese?
For the richest, creamiest texture, full-fat cream cheese is best. Light cream cheese can work, but the filling won’t be quite as luxurious. I haven’t tested with fat-free, so I can’t recommend that substitution.
Have You Tried Our Recipe?
There are no reviews yet. Be the first one to write one.